How to get started with AWS in 10 minutes - sounds ambitious, but it's possible to make significant progress in quick time with a right guidance. The biggest challenge at the beginning is knowing exactly where to look and what to focus on. AWS provides an extensive range of services, and it's easy for new learners to feel overwhelmed and confused by the vast array of terminologies.
In this document I will explain 10 most important things to know for an aws beginner.
1 Why should I learn AWS Cloud Computing?
AWS has been a dominating force in cloud computing for years, in many large and small organizations worldwide. AWS captures around 34% (at the time of writing) of the total cloud computing market share. As more and more companies move their IT infrastructure to the cloud, the demand for cloud computing skills is increasing rapidly. Learning AWS can help you take advantage of this trend and open up new job opportunities.
One of the very strong motivations to learn AWS is, it allows you to scale your IT infrastructure up or down based on demand. This can be particularly useful if your business experiences seasonal fluctuations or if you need to handle sudden spikes in traffic. Moreover, AWS has a robust security infrastructure, and it provides many built-in security features to protect your data and applications. By learning AWS, you can ensure that your applications are secure and compliant with industry standards.
Learning AWS cloud computing can help you stay ahead of the curve in the rapidly evolving IT industry, and it can provide you with the skills and knowledge to build secure, scalable, and innovative applications.
2 Create your first aws account
AWS provides a free tier account, enabling you to access and use a selection of AWS services at no cost, within specific usage limits. This is an excellent opportunity to explore and experiment with over 100 AWS products for free.
To get started, visit AWS Free Tier and click the “Create an AWS Account” button in the top-right corner. You'll need a valid email address to create a root account, which I will explain in detail in the section “4. Protect Your Accounts.”
After signing up, AWS will send a verification code to your email. Enter this code on the next screen and proceed by providing your address, phone number, and credit card details. Rest assured, AWS only verifies your credit card information and does not charge any amount during account creation.
Account activation may take up to 24 hours. Once the process is complete, AWS will notify you via email.

3 Understand AWS free tier account
AWS offers three types of free-tier options, which you can explore in detail on their official page.

However, it's important to understand that not all AWS services are included in the Free Tier, and exceeding the usage limits will result in charges. Reviewing the Free Tier details is crucial to understanding what is available within your account's free usage limits.
To manage and monitor your AWS costs effectively, you can configure billing alerts to notify you when your charges exceed a certain threshold. While AWS does not provide a direct option to enforce a "zero spending limit," setting up billing alarms can serve as a safety measure. These alarms will alert you if your charges go beyond a specified amount, helping you avoid unexpected expenses.
Follow these steps to set up billing alerts in AWS and stay informed about your usage and costs:
1. Access the AWS Billing Console
Log in to your AWS Management Console and navigate to the Billing & Cost Management Dashboard.
2. Enable Billing Alerts
If you haven’t done this already:
- Go to the Billing Preferences page.
- Select Receive Free Tier Usage Alerts to get notifications about your Free Tier usage.
3. Set Up Billing Alarms
To create alarms for charges exceeding the Free Tier limits:
- Navigate to the Budgets Section
- In the Billing & Cost Management Dashboard, locate and click on the Budgets section.
- Create a New Budget
- Click the Create budget button.
- Configure Your Budget
- Name Your Budget: Assign a meaningful name.
- Choose Budget Type: Select Cost budget.
- Set Time Period: Choose a timeframe (e.g., monthly, quarterly, or annually).
- Define Budget Amount: Specify a limit slightly above your expected Free Tier usage to ensure timely notifications before incurring charges.
- Set Up Alerts
- Under Configure alerts, define thresholds for notifications (e.g., when 95% of the budget is reached).
- Optionally, enable email notifications for yourself and others to be alerted when your budget exceeds the defined limits.
- Review and Create
- Review your settings and click Create to finalize the budget and alerts.
By following these steps, you can effectively monitor your AWS costs and prevent unexpected charges.

4 Protect your accounts
Just to recall that we used an email address to create a root aws account. As the name suggests a root email account possesses unlimited access rights to the account; we must protect and use it with care.
It is not recommended to use root email account to perform day-to-day tasks.
First thing you need to do is to enable Multi-factor Authentication (MFA) for your root account. MFA is the way to add more authentication elements in the login credentials to protect your account. You can use SMS or Email verification code, any third party authentication application like Google Authenticator etc.
Click on your user name on the top right corner and then seelct "Security credentials".
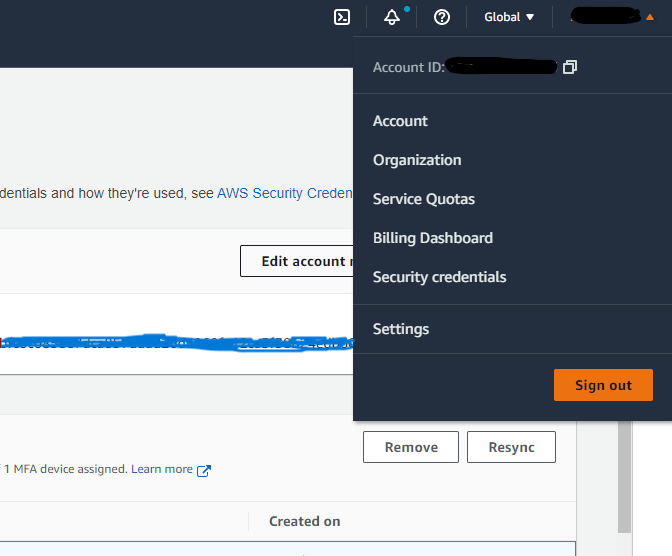
Find the MFA section to add third party authentication.

Verify MFA by logout and login again.
The Root email account has so much power and it is not recommended to use it for day to day work.
Next step is to add another IAM user with admin permissions, which should be used for most of the admin tasks. This “admin” (whatever name it) user will have almost all required permissions which are needed to handle your account, except some services like Billing which can only be handled by Root email account.
5 Understand IAM Users, Groups, Roles and Policies
Identity and Access Management (IAM) is an aws service to define a secure control access to different aws resources. IAM allows us to define different Users, user Groups, user Roles, and access Policies.
User: A user can be any entity, such as a human or an aws service which performs or accesses certain resource in aws.
Groups: Like in an organization we have different groups of people, some belong to accounting and other to IT departments. IAM Groups are exactly like that. We can put IAM users in certain IAM Groups based on actions they are supposed to perform.
Roles: IAM Role actually defines what type of permission a User or Group should possess. For example an aws service assumes a Role to execute another service. Or a human User assumes a Role to upload a file in aws S3 bucket.
Policy: An IAM Policy is the document which defines “rules”, such as which User can perform what action on which resource. IAM policy is written in JSON format, however we can write policy in YAML inside the cloudformation template.
6 Creating IAM Admin User
In the last section we discussed IAM Users, Groups, Roles and Policy to define access permissions. We also read that it is not recommended to use a root email account for routine admin tasks. In this section I will create a new IAM group with the administrator permissions, and then create an IAM user and include that user into the admin group.
In the search bar, type “IAM” and open the IAM console page.

6.1 Creating User Group
Select “User Groups” from the left side menu and then press “Create Group” from the top right corner. On the next screen, write the name of your Group and search “AdministratorAccess” in the search bar in the middle of the page. Basically we are using a predefined User Group template which has admin permissions.

6.2 Creating IAM User
After creating a User Group, we create an IAM User. Go back to the IAM console page and now select “Users” from the left menu. Press the “Add User” button on the top right side.

Select what type of access you want to grant to the new user. If you have intention to use this user for only AWS Management console access then select “Password - AWS Management Console access” option only. Alternatively you can select “Access key - Permission access” if you intend to Programmatically access the aws resources using Command Line Interface (CLI). Let’s select both.
We also selected the “Auto Generated password” option and required the user to change the password at sign in.
Select “Add user to group” option and search group “administrators” and Next to create Tag and then finalize it.

Now we have created an IAM admin user, so we should log out of root account and login as IAM admin user. But we need a special link to login as an IAM user.
Go to the IAM console page and select Dashboard from the left menu. We can create an alias to this user, which is something more memorable. Then copy the “Sign-in URL”. Logout of root account.

Open a new tab in the browser and type the Sign-in URL copied from the last step. You will be asked to set a new password. Sign-in with a new IAM user and use this for the rest of the actions.
Note: Add Multi-Factor Authentication (MFA) for this user as well.
7 Navigate through AWS management console
In the last section we searched “IAM” in the search bar of AWS Management Console to navigate to the IAM console page. Your free tier account allows you to explore many other services in the management console. For example you can search S3, which is a storage service and try to create a S3 bucket (storage place) and then upload a file.
Note: remember to delete S3 bucket when you no longer need it, otherwise aws may charge you for that after the free tier period expires.
8 Install AWS SDK
We have seen how different aws services can be accessed using the management console web page, but we may need to access these resources programmatically or using aws Command Line Interface (CLI).
For that purpose we need to install AWS Command Line Interface, you can find the installation instruction here.
9 Get AWS keys
After installation we need to configure aws environment in our local machine. But before doing that we need AWS Access Key ID and AWS Secret Access Key. We have to create them in the management console account page.
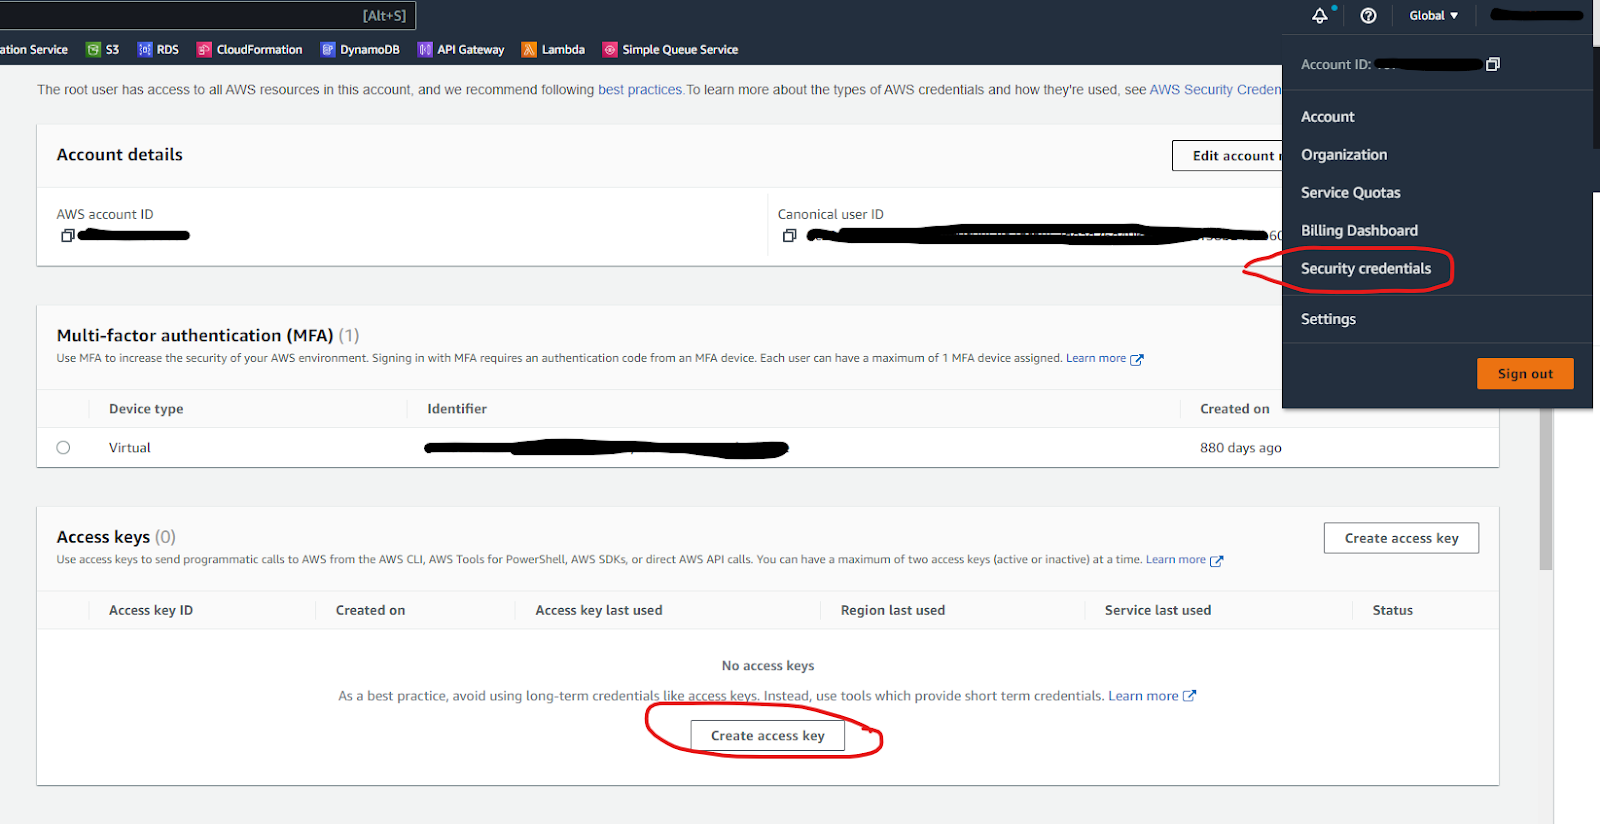
Copy Key ID and Secret key and open a Terminal.
In the terminal write “aws configure”, you will be asked different input as shown below,
$ aws configure
AWS Access Key ID [None]: <your-key-id>
AWS Secret Access Key [None]: <your-secret-key>
Default region name [None]: eu-west-1
Default output format [None]: json
This will create a .aws/ directory on your Home page. Inside .aws/ directory your aws configuration is stored in config file and aws credentials in credential file.
Note: These AWS credentials are long-lived, so it is extremely important to protect them, and delete them when they are no longer needed. It is recommended to use short lived credentials, which uses aws session token, which is not needed at the moment.
10 Use CLI to access aws resources
In the previous section we saw how to configure aws CLI. In this section we will see how to use CLI to access any aws resource and perform some actions.
We will use few aws commands in terminal to interact with S3 bucket, for example
$ aws s3 ls
Will displays all the S3 buckets in our account.
We can create a new S3 bucket by s3api,
$ aws s3api create-bucket --bucket my-bucket LocationConstraint=eu-west-1
We created a new bucket named my-bucket in region eu-west-1.
Upload a file note.txt from current directory to S3 bucket
aws s3 cp note.txt s3://my-bucket/note.txt
Download a file note.txt from S3 location to current local directory
aws s3 cp s3://my-bucket/note.txt note.txt
If you want to delete the bucket
aws s3api delete-bucket --bucket my-demo-s3-bucket --region eu-west-1
Final words
Hope this article gives a good start to your AWS learning. Make good use of your free trier account and do some hands-on excercise.
I strongly recommend you to read my other more advanced articles,