
JWT (JSON Web Token) is a compact token format commonly used for authentication and secure data exchange. In this blog, we will generate RSA asymmetric keys using OpenSSL, sign a JWT with a private key, and verify the JWT using a public key in Python.
If you're looking to learn how to generate and sign JWTs using the jwt.io web tool, this blog will guide you through each step.
JWTs are crucial in modern authentication systems because they provide a secure and efficient way to verify user identity without requiring server-side session storage. Unlike traditional session-based authentication, JWTs are stateless, meaning they can be easily distributed across multiple services, making them ideal for microservices, APIs, and single sign-on (SSO) implementations. Since they are digitally signed, their integrity can be verified, ensuring that the token has not been altered by unauthorized parties.
JWTs are typically exchanged in HTTP requests by including them in the Authorization header using the Bearer schema. For example, an API request might include the header:Authorization: Bearer <your_jwt_token>
This allows the server to extract and validate the token before granting access to protected resources.
Let's dive in!
1. Generate RSA Keys
RSA is a public-key cryptosystem that relies on a pair of cryptographic keys—a private key and a public key—for encryption and decryption. The public key is shared with other parties to encrypt data or verify digital signatures, while the private key must be kept strictly confidential, as it is used to decrypt data or create secure digital signatures. This dual-key mechanism ensures secure communication and authentication, making RSA widely used in SSL/TLS, secure email, and digital signatures.
To create RSA keys, use OpenSSL commands:
First create a private key:
openssl genpkey -algorithm RSA -out private_key.pem -pkeyopt rsa_keygen_bits:4096Get the Public Key from the Private Key:
openssl rsa -pubout -in private_key.pem -out public_key.pem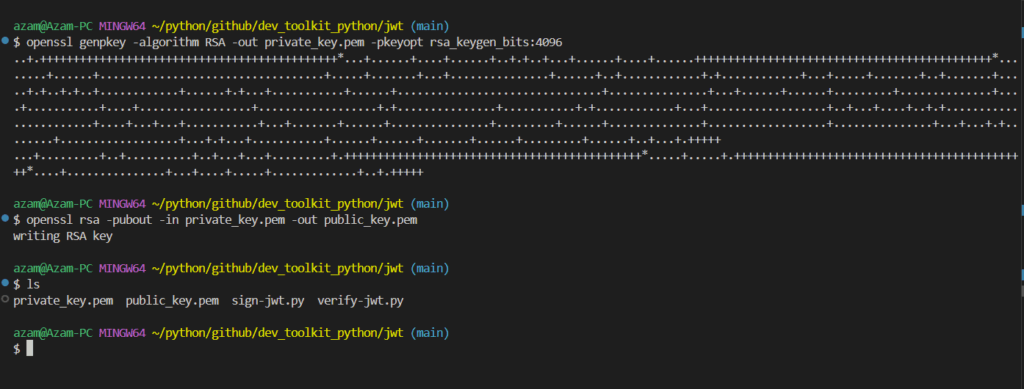
Now, you have:
private_key.pem: Used to sign JWTs.public_key.pem: Used to verify JWTs.
2. Python Script to Sign JWT using Private Key
To generate a JWT, we use the PyJWT Python library. First, let's install it:
pip install pyjwtThe following Python script generates a JWT that remains valid for 7 days and is signed using a private key. It begins by loading the private key file, then defines various JWT fields, including expiration time and issuer details. Finally, it creates and signs the JWT using the private key.
import jwt
import logging
from datetime import datetime, timezone, timedelta

# Configure logging
logging.basicConfig(level=logging.INFO, format="%(asctime)s - %(levelname)s - %(message)s")

def load_private_key(private_key_file):
    """Load private key from file."""
    try:
        with open(private_key_file, "r") as f:
            return f.read()
    except FileNotFoundError:
        logging.error("Private key file not found.")
        return None

def generate_jwt(private_key_file):
    """Generate JWT signed with an RSA private key."""
    private_key = load_private_key(private_key_file)
    if not private_key:
        return None

    header = {
        "alg": "RS256",
        "typ": "JWT",
        "kid": "kid-123"
    }

    payload = {
        "exp": int((datetime.now(timezone.utc) + timedelta(days=7)).timestamp()),
        "iat": int(datetime.now(timezone.utc).timestamp()),
        "aud": "www.example.com",
        "iss": "issuer",
        "sub": "subject"
    }

    try:
        token = jwt.encode(payload, private_key, algorithm="RS256", headers=header)
        logging.info("Generated JWT: %s", token)
        return token
    except Exception as e:
        logging.error("Error generating JWT: %s", str(e))
        return None

if __name__ == "__main__":
    private_key_path = "./private_key.pem"
    jwt_token = generate_jwt(private_key_path)
Now, it is time to run the script and generate a signed jwt,

In next section we will learn how to decrypt and decode this signed JWT.
3. Python Script to Verify and Decode JWT using Public Key
Now, let's create another script to verify the JWT using the public key. This script loads the corresponding public key, decrypts the JWT, and checks if it is valid and not expired. Finally, it prints the decoded JWT to the output console.
import jwt
import logging

# Configure logging
logging.basicConfig(level=logging.INFO, format="%(asctime)s - %(levelname)s - %(message)s")

def load_public_key(public_key_file):
    """Load public key from file."""
    try:
        with open(public_key_file, "r") as f:
            return f.read()
    except FileNotFoundError:
        logging.error("Public key file not found.")
        return None

def verify_jwt(token, public_key_file):
    """Verify and decode JWT using an RSA public key."""
    public_key = load_public_key(public_key_file)
    if not public_key:
        return None

    try:
        decoded_payload = jwt.decode(token, public_key, algorithms=["RS256"], audience="www.example.com")
        logging.info("Decoded JWT Payload: %s", decoded_payload)
        return decoded_payload
    except jwt.ExpiredSignatureError:
        logging.error("JWT has expired.")
    except jwt.InvalidTokenError:
        logging.error("Invalid JWT.")
    except Exception as e:
        logging.error("Error verifying JWT: %s", str(e))

    return None

if __name__ == "__main__":
    public_key_path = "public_key.pem"
    token = input("Enter JWT to verify: ")
    verify_jwt(token, public_key_path)
When we run this script, it will ask to provide JWT as input. Copy the signed JWT generated in previous step, and paste here,

This script used corresponding public key to decrypt the JWT and print the decoded JSON object on output console. Perfect!
Conclusion
In this blog, we:
- Generated RSA key pairs using OpenSSL.
- Signed a JWT using a private key with RS256 encryption.
- Verified and decoded the JWT using the corresponding public key.
This method is a fundamental approach in authentication systems like OAuth and OpenID Connect, ensuring secure and stateless authentication across various applications.