
Setting up AWS VPC and hosting a web server on EC2 is a fundamental step in deploying scalable and secure cloud-based applications. Amazon Virtual Private Cloud (VPC) allows you to create a logically isolated network within AWS, giving you complete control over your networking environment. In this blog, we will walk through the entire process of creating a VPC, setting up a public subnet, configuring an internet gateway, and launching an EC2 instance to host a web server. By the end of this guide, you will have a fully functional web server running in AWS.
Before proceeding, you need an AWS account. If you don’t have one, this blog will guide you through setting up a free-tier AWS account.
We will start by creating a VPC, followed by setting up a public subnet that will allow our EC2 instance to communicate with the internet. Next, we will configure an Internet Gateway and attach it to our VPC, ensuring external connectivity. We will then update the route table to direct internet traffic through this gateway. Additionally, we will create a security group to allow ssh connection and http traffic to our instance.
Once the networking setup is complete, we will launch an EC2 instance within our public subnet. Using user data scripts, we will automate the installation of a web server at launch, ensuring that our instance is ready to serve requests immediately. Finally, we will test our setup to confirm that the web server is accessible from the internet and we can also connect to ec2 instance through ssh.
To wrap up, we will also cover the cleanup process to remove all AWS resources created in this blog, helping you avoid unnecessary charges.
Let's get started!
Create VPC
To get started, log in to the AWS Management Console, search for VPC, and open the VPC Dashboard.
- Click the Create VPC button.
- On the Create VPC page, you will see two options:
- VPC only – Choose this option.
- VPC and more – This creates additional resources automatically, but we don’t need that for now.
- In the Name tag - optional field, enter a name for your VPC. Let’s name it My-VPC.
- Under IPv4 CIDR, specify an IP range. Enter 10.0.0.0/16.
- Leave all other settings as default.
- Click the Create VPC button at the bottom of the page.
That's it! Your VPC is now created in just a few clicks.
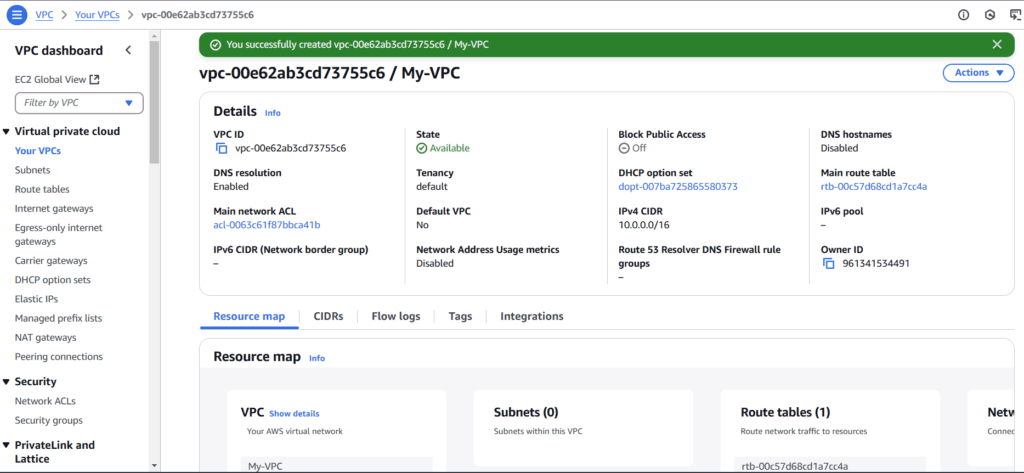
A default route table is automatically created for us, and we will explore it in detail in an upcoming section.
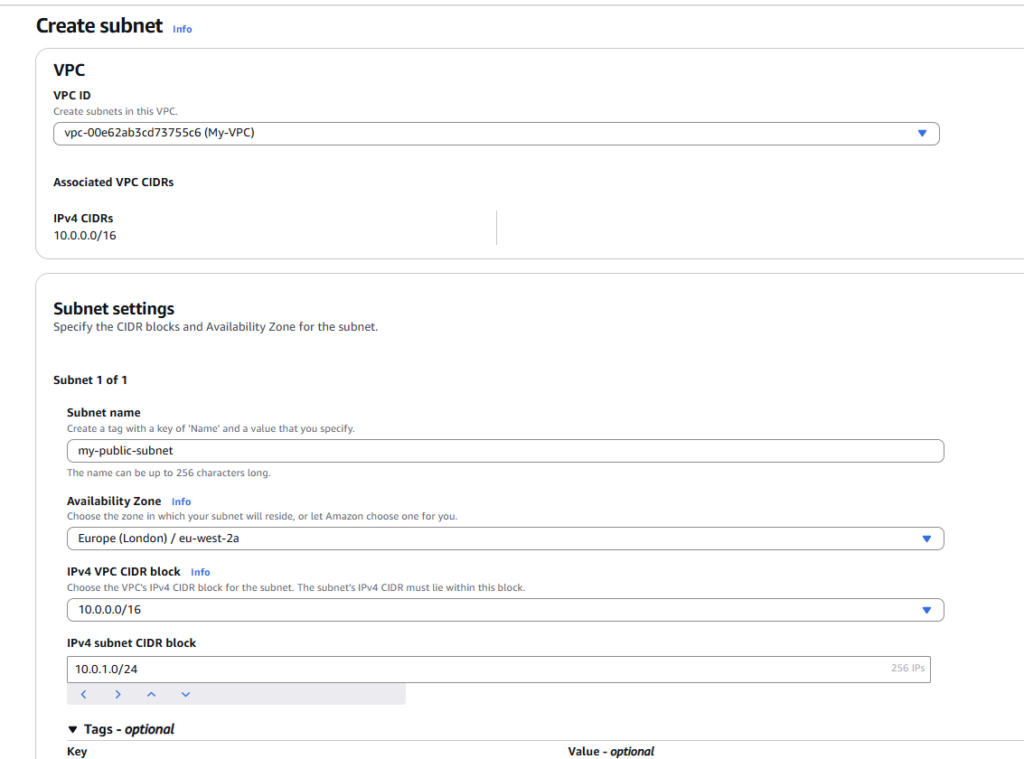
Create Subnet
Now that we have our VPC, the next step is to create a public subnet within it.
- In the AWS VPC Dashboard, select Subnets from the left-side menu.
- Click the Create Subnet button.
- On the Create Subnet page:
- Choose your VPC from the dropdown list. Select My-VPC (the one we created earlier).
- Enter a name for your subnet. Let’s call it my-public-subnet.
- Select an Availability Zone where you want to create the subnet. Here, we are using eu-west-2.
- In IPv4 Subnet CIDR block, define the IP range for this subnet. Since we only need 256 private addresses, we set it to 10.0.1.0/24 (Note: /24 allows 256 IPs, while /16 allows 65,536 IPs).
- If you need additional subnets, you can add more, but for this example, we are creating just one.
- Leave all other settings as default.
- Click the Create Subnet button.
Your public subnet is now successfully created!
AWS will create the subnet instantly.
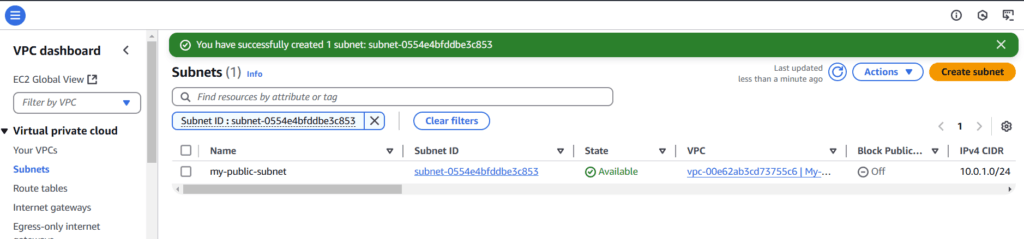
We can see that a route is automatically associated with our subnet.
We need to enable auto-assign public IP for our subnet. To do this:
- Select the my-public-subnet from the subnet list.
- Click Actions and choose Edit subnet settings.
- Check the option Enable auto-assign public IPv4 address.
This ensures that instances launched in this subnet receive a public IP automatically.

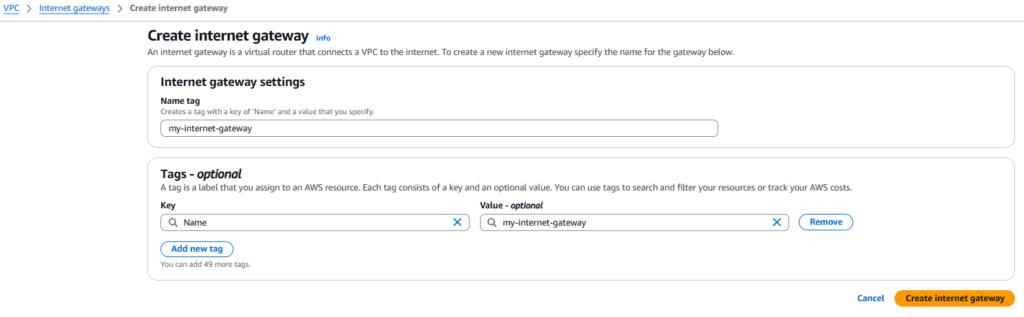
Create Internet Gateway
Now we will create an internet gateway to give our webserver access to internet
- In the AWS VPC Management Console, select Internet Gateways from the left menu.
- Click the Create Internet Gateway button.
- Name the internet gateway my-internet-gateway, and click Create Internet Gateway.
Next, we need to attach this internet gateway to our VPC:
- In the Internet Gateway page, select the gateway you just created.
- From the top-right Actions menu, choose Attach to VPC.
- In the dropdown menu, select your VPC (My-VPC), and click Attach Internet Gateway.
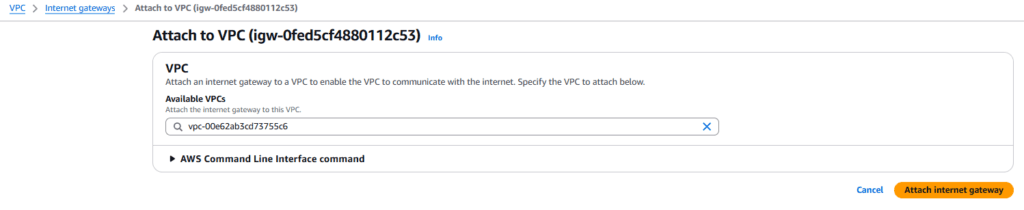
Your internet gateway is now successfully attached to the VPC!
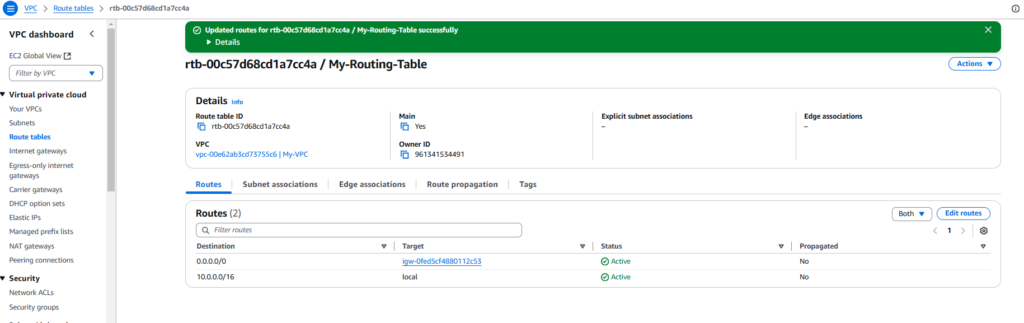
Adding Route
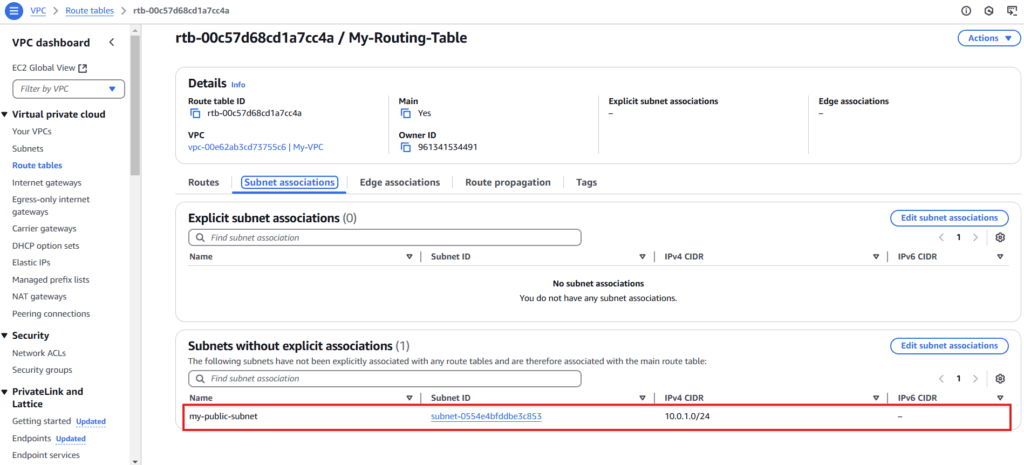
Now, let's add a route to the main routing table.
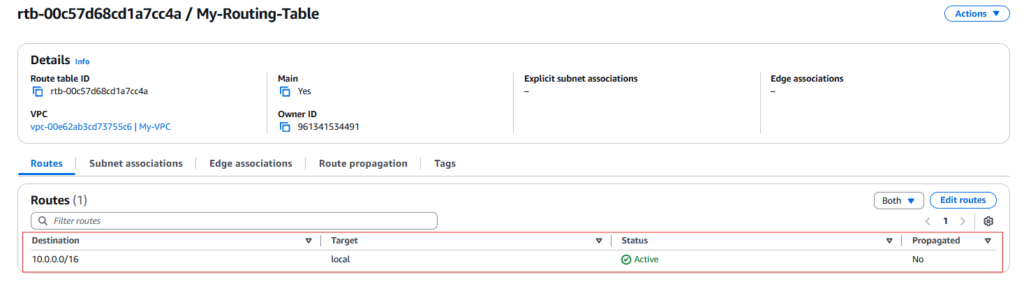
- Go to the Routing Tables page and select My-Routing-Table.
- In the Routes tab, you’ll see a default local route.
- To enable internet access, we need to add a route for the internet gateway.
- Set the Destination to 0.0.0.0/0 (which means any IP address).
- In the Target field, select the Internet Gateway.
- Click Save Changes to add the route.
This route will allow traffic to flow from our subnet to the internet through the internet gateway.
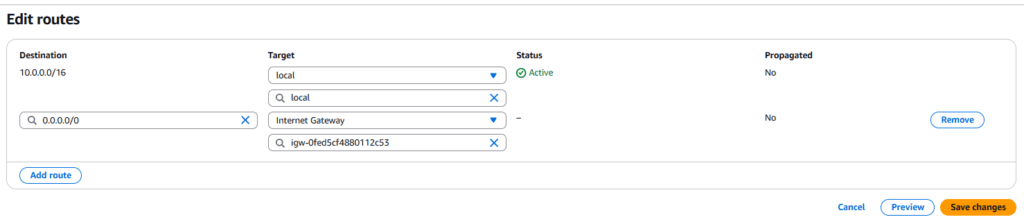
Now route to internet gateway is added
Create Security Group
Create a Security Group
- In the EC2 Console, select Security Groups from the left-side menu, and click Create Security Group.
- On the Create Security Group page, give your security group a name, such as My-Web-Server-SG.
- Select My-VPC from the dropdown menu.
Now, let's add two inbound rules for HTTP and SSH:
- Inbound Rule 1:
- Type: SSH
- Destination: Anywhere
- Inbound Rule 2:
- Type: HTTP
- Destination: Anywhere
- Click Save Rules to apply the settings.
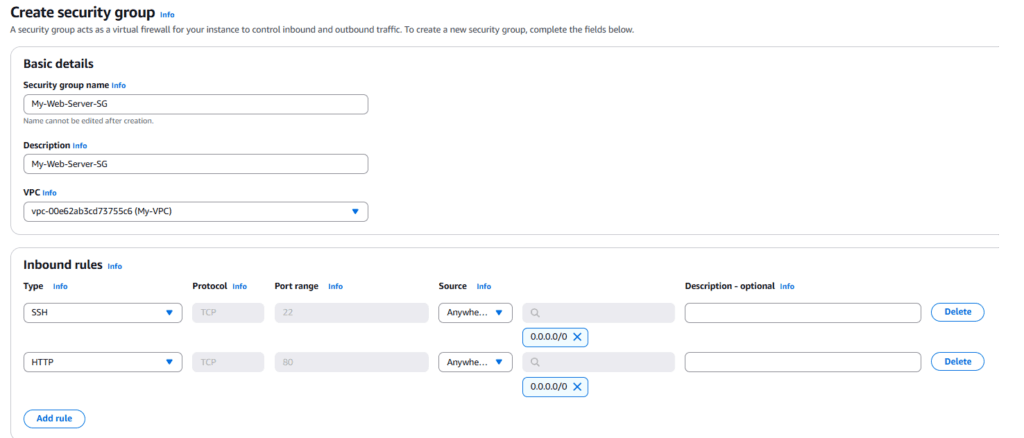
Your security group is now configured to allow SSH and HTTP traffic from anywhere.
Launch EC2 Instance
- Go to the EC2 Console and click on Launch Instance.
- Give your EC2 instance a name, such as My-WebServer-Ec2-Instance.
- For the AMI, choose the Amazon Linux 2023 AMI, and for the Instance Type, select t2.micro, which is eligible for the free tier.
- In this example, we’ll choose Proceed without a key pair. Although AWS recommends using a key pair for security, we’re skipping it for simplicity in this tutorial.
Now, let’s configure the Network Settings:
- Select the VPC we created earlier, My-VPC, by choosing Edit Settings and selecting it from the dropdown list.
- In the Security Group section, choose Select existing security group, then select My-Web-Server-SG from the dropdown menu.
Next, we’ll set up a web server on the EC2 instance.
Scroll to Advanced Details and provide the following User Data to install and start the Apache web server:
#!/bin/bash
yum update -y
yum install -y httpd
systemctl start httpd
systemctl enable httpd
Finally, click Launch Instance.
The EC2 instance will take a few seconds to a few minutes to be set up and ready to use.

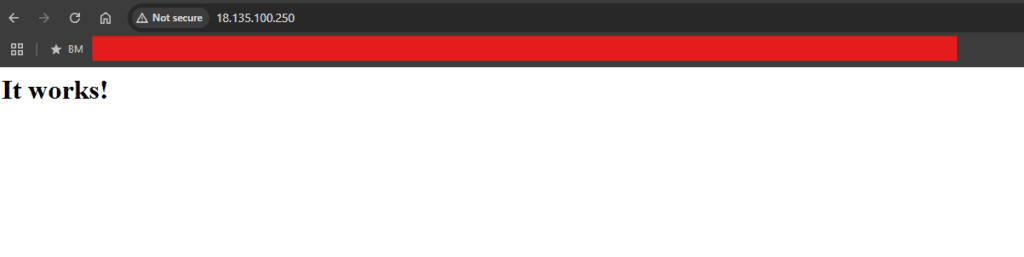
Test our EC2 instance
To test the HTTP request:
- In the EC2 Console, select your instance and copy its Public IP address.
- Paste the Public IP into your browser’s address bar and hit Enter.
You should see the default web page, confirming that the web server is successfully running on your EC2 instance.
To test SSH access:
- In the EC2 Console, select your instance and click the Connect button from the top menu.
- On the next page, choose Connection Type and select Connect using EC2 Instance Connect.

We have now connected with our web server using ssh.

Clean up the artefacts
To clean up the resources after testing:
- Terminate the EC2 Instance:
In the EC2 Console, select your instance and choose Terminate. - Delete the Security Group:
Go to the Security Groups page, select My-Web-Server-SG, and click Delete. - Delete the Subnet:
In the Subnets section, select my-public-subnet and click Delete. - Detach the Internet Gateway:
In the Internet Gateways section, select my-internet-gateway and choose Detach from the VPC. - Delete the Internet Gateway:
After detaching, select my-internet-gateway again and click Delete. - Delete the VPC:
Finally, go to the VPC section, select My-VPC, and click Delete.
This will remove all the resources created during the setup process.