AWS Step Functions offer a robust solution for building and managing complex workflows by orchestrating various AWS services, including Lambda. In this article, I'll show you how to use AWS Step Functions to orchestrate a serverless Go environment, automating workflows and managing task dependencies seamlessly with Go-based Lambda functions.
We will build a complete serverless workflow using AWS Step Functions to orchestrate three different Lambda functions, each performing a specific task in the workflow:
- Input Validation: This function validates the input.
- Data Processing: Once validation is successful, this function processes the input data. For simplicity, in this example, it appends a string to the input value, but the function can be extended to handle more complex data processing tasks as needed.
- Result Storage: After the data is processed, this function is designed to store the processed result in a database, such as DynamoDB. For simplicity, we’ll use a placeholder for the database operations in this example, but you can easily extend it for your data storage needs.
Prerequisites
- AWS CLI installed and configured.
- Basic knowledge of Go and AWS Lambda.
- Cloudformation templates.
- You should have a solid understanding of how to create, package, and deploy a Lambda function using CloudFormation. If you're not familiar with this process, don’t worry—this article will guide you through each step.
Let’s jump right into it with a practical example!
Create Lambda Functions
As mentioned, we will create three Lambda functions to handle different stages of the workflow.
1. Input Validation Lambda
This function checks if the input data is valid.
package main
import (
	"context"
	"github.com/aws/aws-lambda-go/lambda"
)

type Input struct {
	Value string `json:"value"`
}

type ValidationResponse struct {
	IsValid bool   `json:"is_valid"`
	Message string `json:"message"`
}

func HandleRequest(ctx context.Context, input Input) (ValidationResponse, error) {
	if input.Value == "" {
		return ValidationResponse{
			IsValid: false,
			Message: "Input value is empty.",
		}, nil
	}
	return ValidationResponse{
		IsValid: true,
		Message: "Input is valid.",
	}, nil
}

func main() {
	lambda.Start(HandleRequest)
}
2. Data Processing Lambda
This function processes the input data and returns a processed result.
package main
import (
	"context"
	"fmt"
	"github.com/aws/aws-lambda-go/lambda"
)

type Input struct {
	Value string `json:"value"`
}

type ProcessedData struct {
	ProcessedValue string `json:"processed_value"`
}

func HandleRequest(ctx context.Context, input Input) (ProcessedData, error) {
	processedValue := fmt.Sprintf("Processed_%s", input.Value)
	return ProcessedData{
		ProcessedValue: processedValue,
	}, nil
}

func main() {
	lambda.Start(HandleRequest)
}
3. Result Storage Lambda
This function is designed to store the processed results in a database. While I won't be including the actual database handling code, I will provide a placeholder to illustrate where the data storage logic would be implemented.
You can find details about saving data from lambda function to AWD DyanmoDB here.
package main
import (
	"context"
	"fmt"
	"github.com/aws/aws-lambda-go/lambda"
)

type ProcessedData struct {
	ProcessedValue string `json:"processed_value"`
}

func HandleRequest(ctx context.Context, data ProcessedData) (string, error) {
	// Simulate storing in a database
	fmt.Printf("Storing result: %s\n", data.ProcessedValue)
	return "Data successfully stored!", nil
}

func main() {
	lambda.Start(HandleRequest)
}
Build lambda functions
Before deploying, you must build and upload your Go Lambda function ZIP files to an S3 bucket. For each function, compile and zip the binaries:
We need to set some environment variables:
set GOOS=linux && set GOARCH=amd64 && set CGO_ENABLED=0Build go project:
We will build each lambda function by,
GOOS=linux go build main.goPackage lambda function
You can create zip file for each lambda function by any method, but in this excercise we will use build-lambda-zip tool to create .zip file, let's install it first,
go install github.com/aws/aws-lambda-go/cmd/build-lambda-zip@latestNow create zip files,
build-lambda-zip.exe aws-lambda-input-validater.zip mainRepeat above steps for the other two Lambda functions.
Importing ZIP files to S3:
aws s3 cp aws-lambda-input-validater.zip s3://<your-s3-bucket>/aws-lambda-input-validater.zip
aws s3 cp aws-lambda-data-processor.zip s3://<your-s3-bucket>/aws-lambda-data-processor.zip
aws s3 cp aws-lambda-result-persistor.zip s3://<your-s3-bucket>/aws-lambda-result-persistor.zip
We have created the required lambda functions, packaged their zip files, and uploaded them to S3 bucket. In the next section, we will create a state machine to orchestrate a workflow by triggering each lambda function sequentially using AWS Step Functions.
Create the AWS Step Functions State Machine
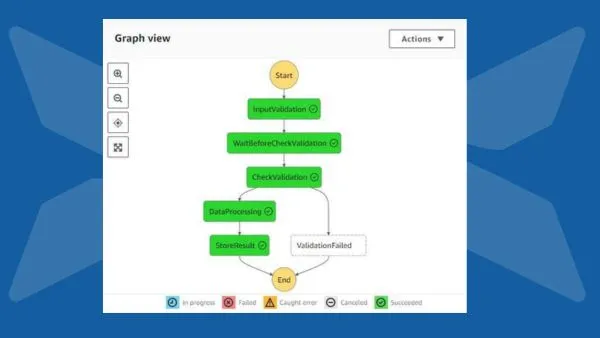
The Step Functions workflow will orchestrate our Lambda functions. We’ll use a Sequential Workflow that follows these steps:
- Validate input.
- Add Wait for 5 seconds after input validation
- Process the data.
- Store the result.
State Machine Definition (in YAML)
# AWS Step Functions State Machine
MyStateMachine:
  Type: AWS::StepFunctions::StateMachine
  Properties:
    Definition:
      Comment: "A workflow to validate, process, and store data."
      StartAt: "InputValidation"
      States:
        InputValidation:
          Type: Task
          Resource: !GetAtt InputValidationFunction.Arn
          Next: WaitBeforeCheckValidation
        WaitBeforeCheckValidation:
          Type: Wait
          Seconds: 5
          Next: CheckValidation
        CheckValidation:
          Type: Choice
          Choices:
            - Variable: "$.is_valid"
              BooleanEquals: true
              Next: DataProcessing
          Default: ValidationFailed
        DataProcessing:
          Type: Task
          Resource: !GetAtt DataProcessingFunction.Arn
          Next: StoreResult
        StoreResult:
          Type: Task
          Resource: !GetAtt ResultStorageFunction.Arn
          End: true
        ValidationFailed:
          Type: Fail
          Cause: "Input validation failed."
    RoleArn: !GetAtt StepFunctionsExecutionRole.Arn
If you prefer JSON format, you can easily convert this YAML to a JSON formate using this tool.
Key States:
- InputValidation: Invokes the
InputValidationLambda. - Wait: A 5-second wait has been added after the input validation to demonstrate the functionality of the Wait state.
- CheckValidation: A
Choicestate that checks whether the input is valid or not. - DataProcessing: Invokes the
DataProcessingLambda if the input is valid. - StoreResult: Stores the processed result in a data store using the
ResultStorageLambda. - ValidationFailed: A failure state if the input is invalid.
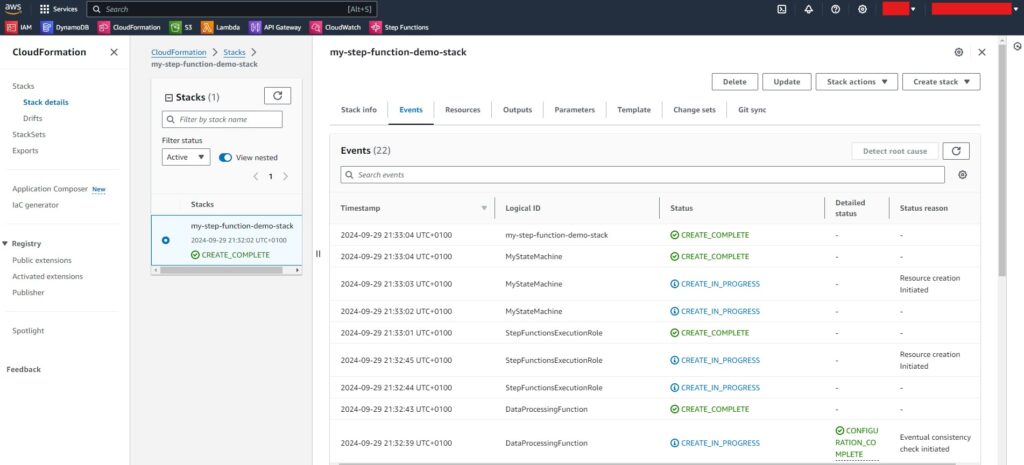
Deploy Resources Using AWS CloudFormation
We will deploy all the required resources, including Lambda functions, Step Functions, and IAM roles, using a single CloudFormation template. This template sets up three Lambda functions—responsible for input validation, data processing, and result storage—while also configuring a Step Function to manage the workflow. Additionally, it creates the necessary IAM roles to ensure secure invocation of the Lambda functions by the Step Function during each stage of execution.
Create the CloudFormation Template (template.yaml):
You can find the complete template in my GitHub repository here.
Deploy the CloudFormation Stack:
You can now create the stack using the AWS CLI or the AWS Management Console.
Using AWS CLI:
aws cloudformation deploy \
--template-file ./template.yml \
--stack-name my-step-function-demo-stack \
--capabilities CAPABILITY_IAM \
--parameter-overrides \
 pLambdaCodeBucket=<your-s3-bucket> \
 pInputValidationCodeS3KeyPath=aws-lambda-input-validater.zip \
 pDataProcessingCodeS3KeyPath=aws-lambda-input-validater.zip \
 pResultStorageCodeS3KeyPath=aws-lambda-input-validater.zip
This will deploy your Lambda functions and create the associated resources as per the template.
Execute the Step Function
After deploying the state machine, you can test the workflow by manually triggering an execution through the AWS CLI:
aws stepfunctions start-execution \
  --state-machine-arn arn:aws:states:<aws-region>:<aws-acount-id>:stateMachine:<state-machine-name> \
  --input '{"value": "test"}'
This command starts an execution of the Step Functions state machine with the provided input. The workflow will pass through the validation, processing, and result storage states.
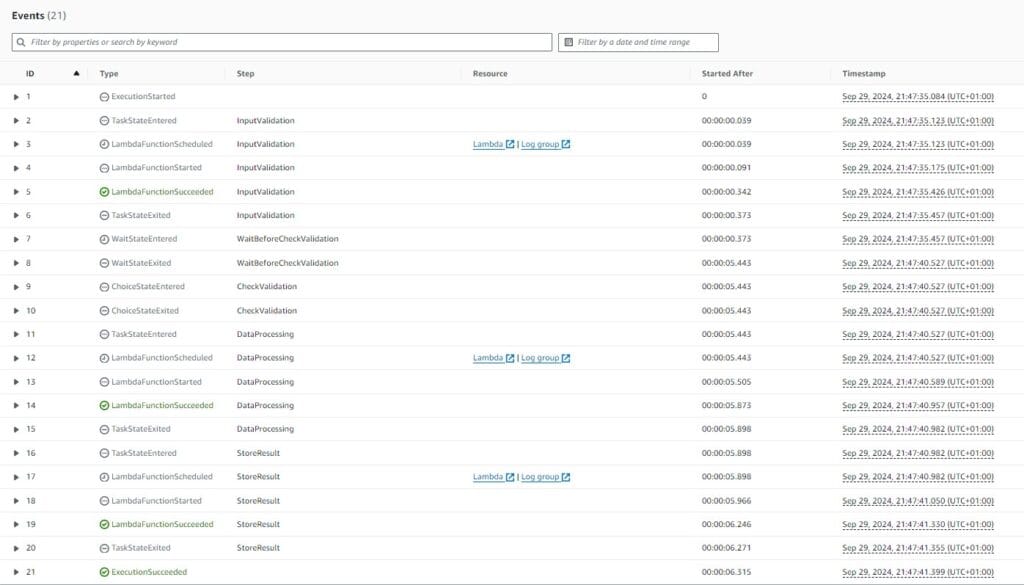
Monitor the Workflow
Once the execution starts, you can monitor the workflow using the AWS Step Functions Console.

You can view:
- Current state: Which part of the workflow is executing.
- Execution history: Log of all steps and results.
- Error handling: If the input validation fails, the state machine will stop at the
ValidationFailedstate.
Since we created a CloudWatch log group in the CloudFormation stack, you can check the logs for each Lambda function directly in CloudWatch.
Conclusion
In this article, we demonstrated how to leverage AWS Step Functions with Go-based Lambda functions to create a robust and scalable workflow. By orchestrating various stages—validation, processing, and result storage—we achieved a clear separation of concerns, making it easier to manage and scale each component independently. As you explore this approach, you’ll find that combining AWS services with Go can significantly improve your application development process.