In this article, I will guide you through the process of setting up an AWS EC2 instance with Ubuntu OS and Jenkins. I'll cover all the essential steps needed to launch an EC2 instance, configure its secuiry groups and install jenkins server
Prerequisites
- To get hands-on experience, you'll need an AWS account. If you're new to AWS and want to set up a free tier account, this article will guide you step by step.
- Basic understanding of Jenkins automation.
Introduction
AWS Elastic Compute Cloud (EC2) is a web service that enables users to provision virtual servers, known as EC2 instances, in a matter of minutes. These instances work as virtual machines, allowing users to run various applications and services on the AWS platform. Whether you need to host a website, run a database, or execute complex computations, AWS EC2 instances offer the power and versatility to meet your specific requirements.
Jenkins is an open-source automation server, which has greatly improved the way software is developed and deployed by providing a robust platform for Continuous Integration and Deployment (CI/CD). Though there are several build automation choices available Today, Jenkins is very popular among software teams and individuals seeking to automate their build, test, and deployment processes, thanks to its flexibility, scalability, and extensive plugin ecosystem
Let's now explore the necessary steps to set up and launch your Jenkins server on an AWS EC2 instance running Ubuntu.
Setting up Ubuntu OS EC2 Instance
let's walk through the steps needed to set up an Ubuntu AWS EC2 instance:
- Sign in to the AWS Management Console
- Search EC2 in Search bar and navigate to the EC2 Dashboard.
- Click on the "Launch Instance" button and choose any Amazon Machine Image (AMI). In this example I will be using Ubuntu OS.
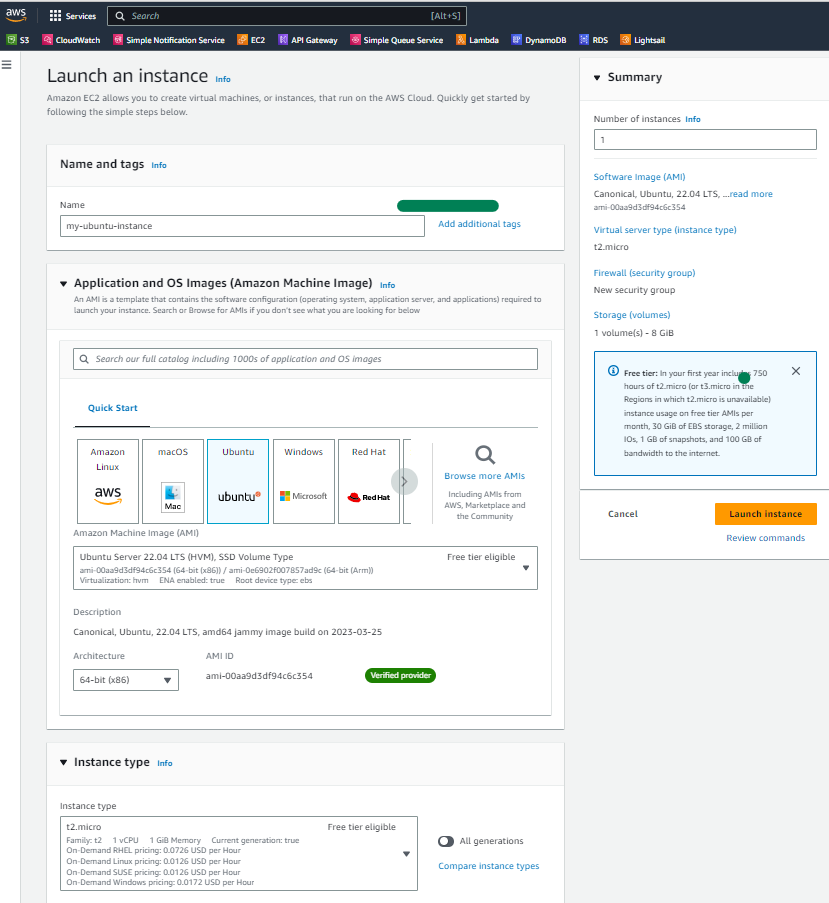
- Create Key Pair: Create or select an existing key pair for secure access to the instance. In this blog, I will create a new key pair. Click on "Create new key pair", you will get a screen where you can name your key and download it in whichever format (.pem or .pkk) you want. I download my key as "
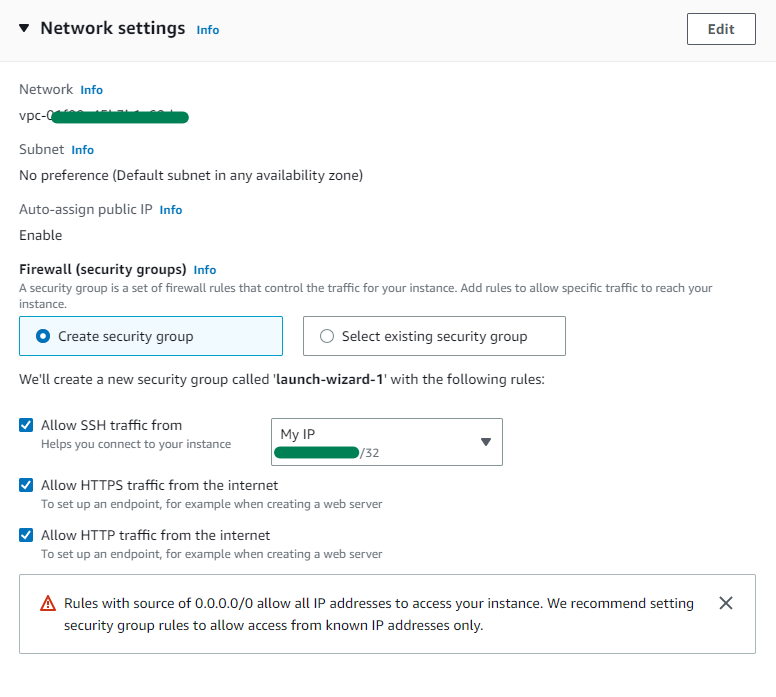
my-ubuntu-key.pem" to default ssh directory, i.e.~/.ssh - Network Settings: Configuring network settings is crucial to ensure secure and efficient communication with your EC2 instance. One important aspect is defining well-thought-out inbound rules, which control the incoming traffic to your instance. For secure communication it is critical to limit SSH access only to the trusted IP addresses. In this example I allow SSH connection to my ec2 instance only from my local IP address. Additionally, for the sake of simplicity, I want to allow HTTP and HTTPS traffic from anywhere in the world (0.0.0.0/0), BUT this may not be a recommended approach. You should consider allowing only a set of trusted IP addresses to access your Jenkins services.
- We are all set to Launch EC2 instance - press "Launch Instance". AWS may take few minutes to start ec2 instance. You will first see status "Initializing",

- Finally ec2 instance is running,

- Click on instanceId to view details,
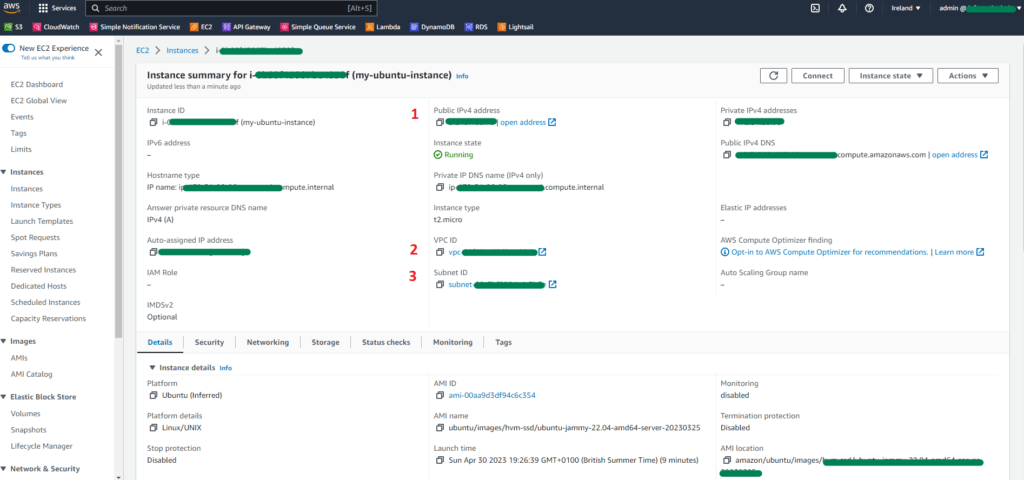
We have now launched a new Ubuntu ec2 instance.
Connect to EC2 instance
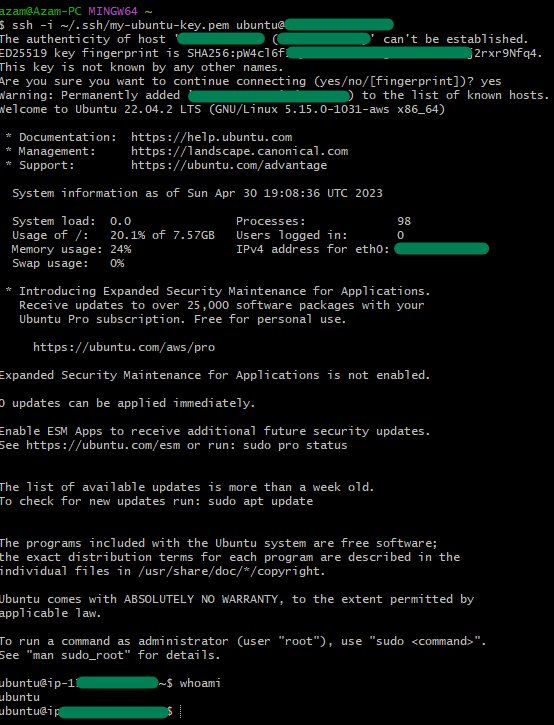
In the previous section we created and downloaded SSH Key pair for ec2 instance. We also configured an inbound rule to enable SSH access from my local IP address. It's time to establish the connection to the EC2 instance.
Open a terminal or command prompt and use SSH to connect to the EC2 instance:
ssh -i ~/.ssh/my-ubuntu-key.pem ubuntu@public_ip_addressSince we have installed Ubuntu OS on the EC2 instance, we will be using the SSH username "
ubuntu". However, it's important to note that certain other operating systems may use "ec2-user" as the default username.
Install and Setup Jenkins
Open a terminal and update the package repository on the Ubuntu instance:
sudo apt updateJenkins requires to have jdk installed on the machine. I'll install OpenJDK using the following command:
sudo apt install openjdk-11-jreOnce installation is finish, verify Java installation:
java -versionOutput:
openjdk 11.0.18 2023-01-17
OpenJDK Runtime Environment (build 11.0.18+10-post-Ubuntu-0ubuntu122.04)
OpenJDK 64-Bit Server VM (build 11.0.18+10-post-Ubuntu-0ubuntu122.04, mixed mode, sharing)
Download the Jenkins repository key and add to your system to ensure package authenticity. Execute the following commands:
curl -fsSL https://pkg.jenkins.io/debian-stable/jenkins.io-2023.key | sudo tee \
  /usr/share/keyrings/jenkins-keyring.asc > /dev/null
Add the Jenkins software repository to the source list and provide the authentication key:
echo deb [signed-by=/usr/share/keyrings/jenkins-keyring.asc] \
  https://pkg.jenkins.io/debian-stable binary/ | sudo tee \
  /etc/apt/sources.list.d/jenkins.list > /dev/null
Update the system repository again:
sudo apt-get updateinstall Jenkins:
sudo apt-get install jenkins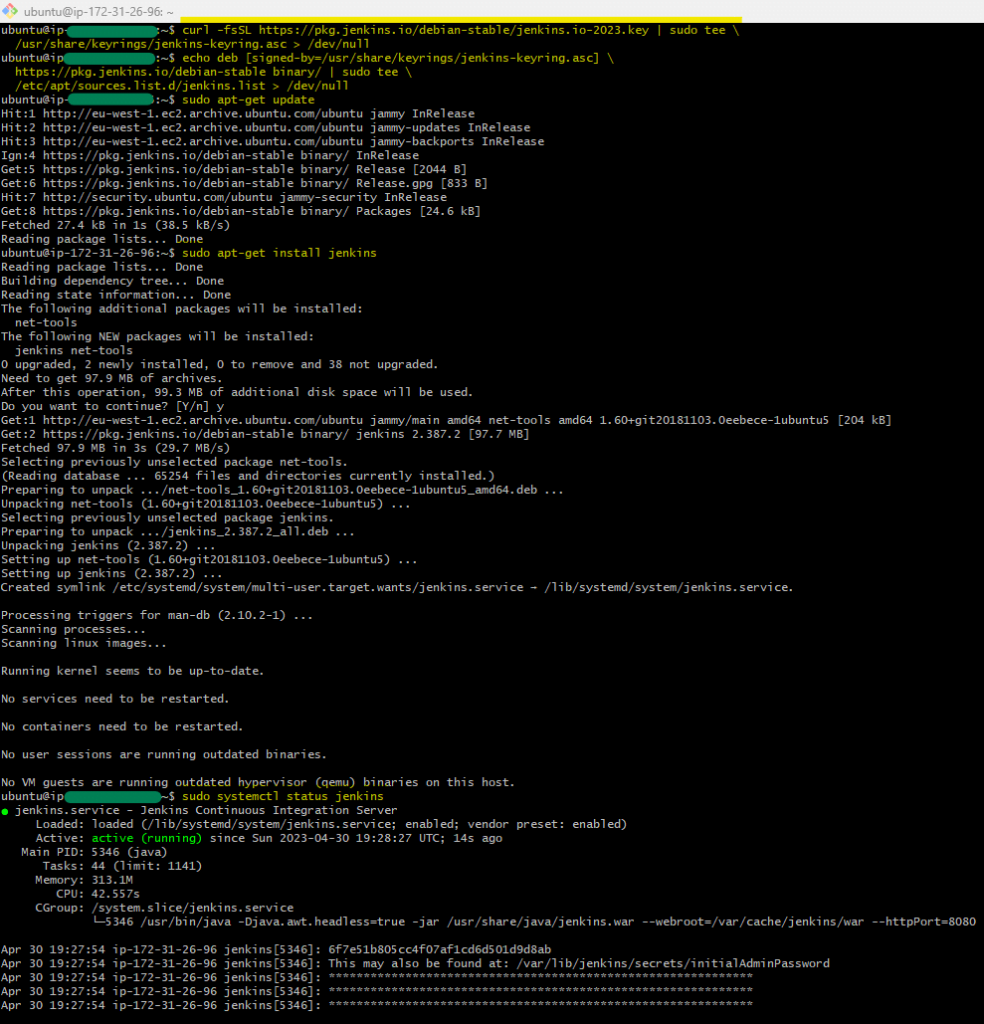
Check Jenkins status:
sudo systemctl status jenkinsBy Default, Jenkins run on port 8080. Let's try to access it's UI by http://<<IP-address>>:8080
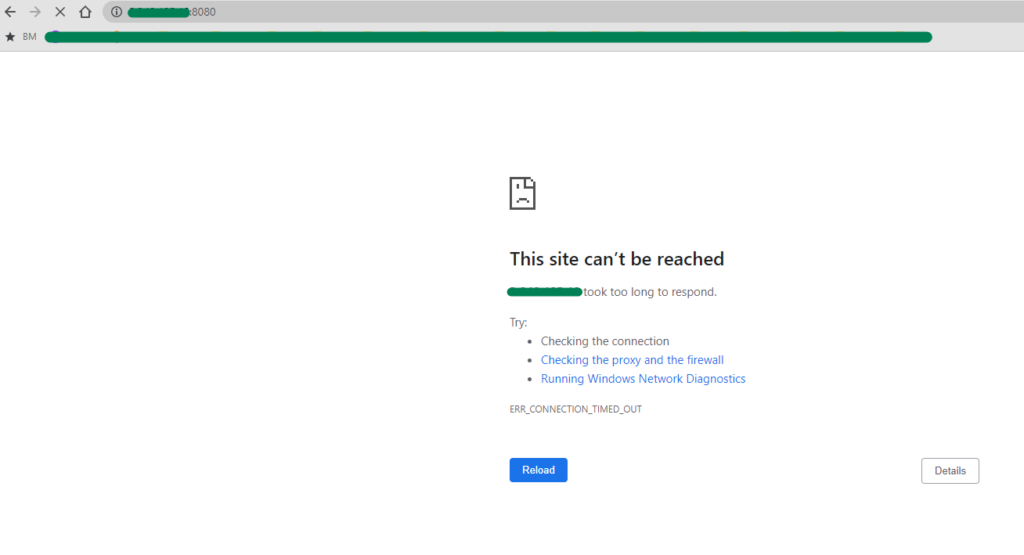
Oppss.. We get Timeout, but why?
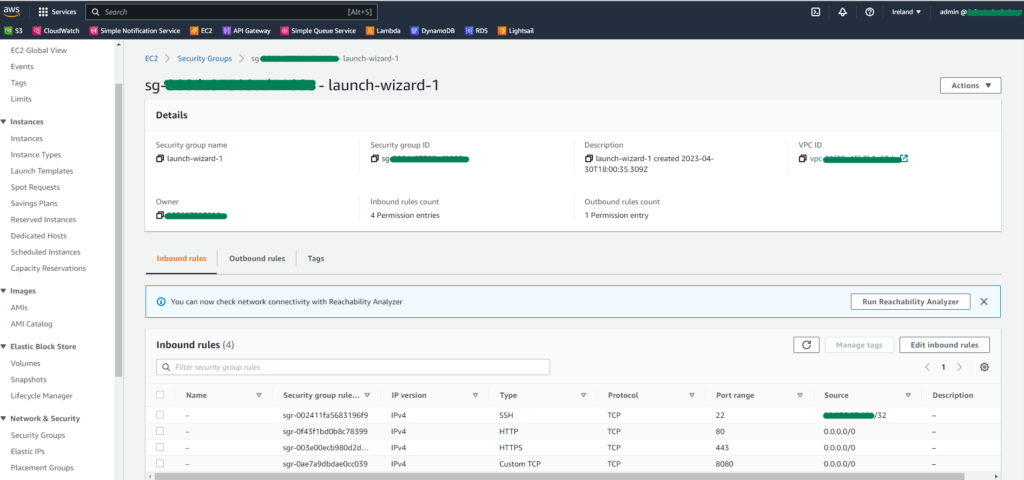
Reason is while defining EC2 instance security group inbound rules, we had not defined any inbound rule for port 8080, which is used by Jenkins. Let's add that now..
Navigate to EC2 in AWS Management Console and select "Security Group" from left side menu, add a new inbound rule to allow trafic from any IP address to this instance at port 8080. You can limit the IP address range to give this access.
Now let's try to access Jenkins service one more time,
Great!! we can access Jenkins service.
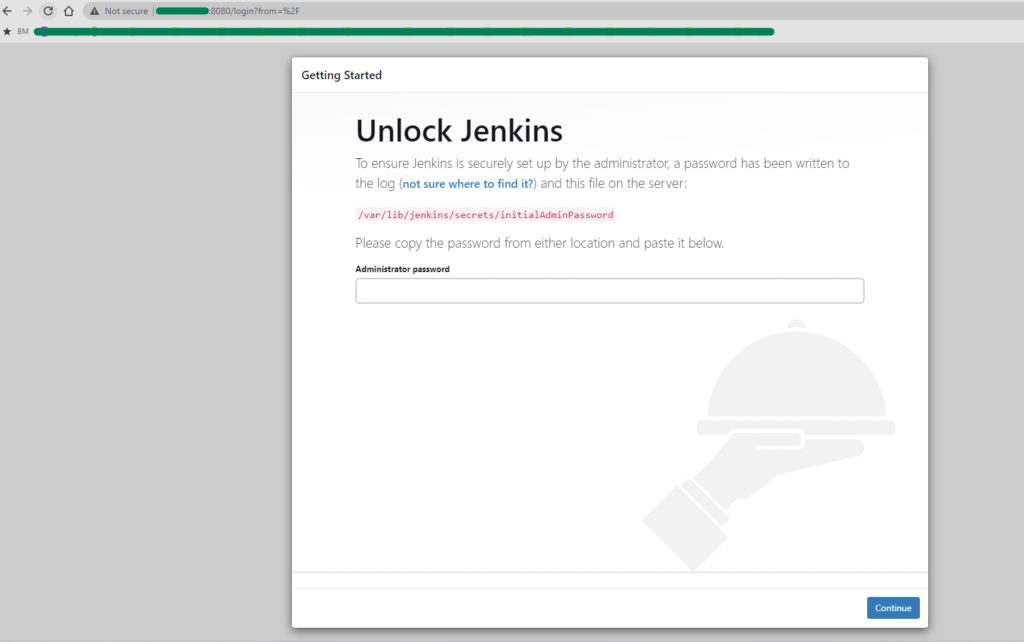
To obtain the admin user password and unlock Jenkins, enter the following command in the terminal:
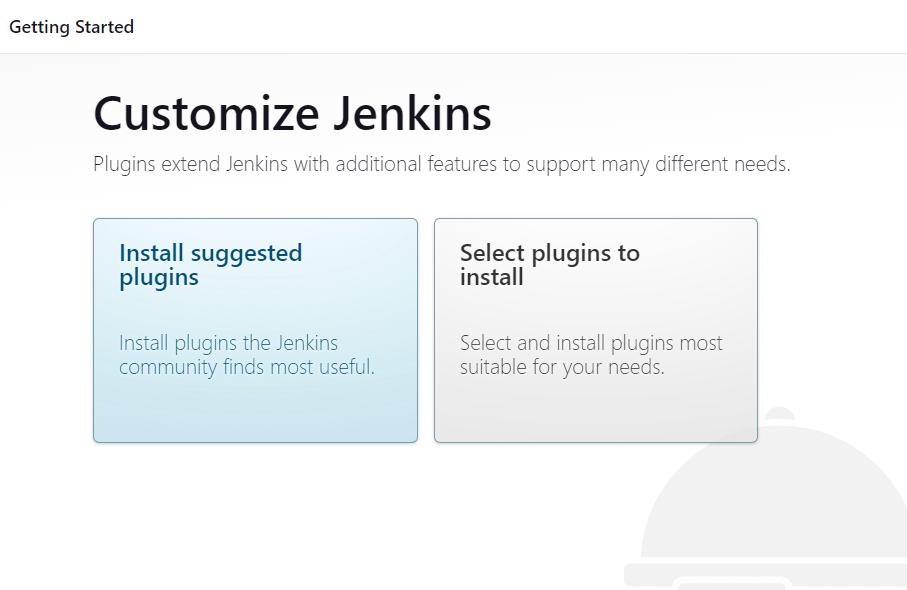
sudo cat /var/lib/jenkins/secrets/initialAdminPasswordThe command written above will display the password to unlock Jenkins in the command prompt. Copy the password and paste it into the Jenkins user interface. Once done, you will be presented with a window to install the recommended plugins.
While the default set of plugins provided with Jenkins may not meet all your needs, you can enhance its automation capabilities and integration functionality by adding specific plugins. These additional plugins expand the range of features and improve the overall performance of Jenkins.
In the subsequent step, Jenkins will provide choices of creating a "First Admin User" or "Skipping and continuing as admin." I select to skip creating a new user and proceeded as an admin.
In next step, just Save and Finish. Jenkins is fully ready and running now.
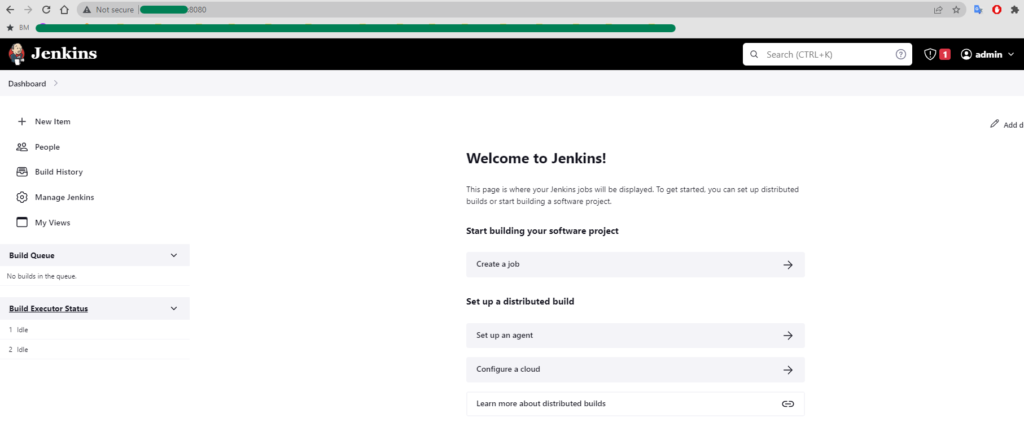
Congratulations! You have successfully completed the journey of setting up an AWS EC2 Ubuntu instance and installing Jenkins on top of it.
Conclusion
By following the step-by-step guide provided in this blog, you have learnt the skills required to utilize the power of cloud computing and streamline your software development processes. With AWS EC2 instances up and running, you can have a scalable and flexible platform to host your applications. Whereas, Jenkins enables you with automation capabilities for continuous integration and deployment. By combining these two powerful tools, you are well-equipped to enhance your development workflows, improve collaboration, and accelerate your software delivery cycles.
If you're looking to learn for more technology-related articles, head over to this really useful resource.