
JSON Web Tokens (JWTs) have quickly become a popular method for securely transmitting information between parties in web applications. Their compact and efficient format makes them an ideal choice for developers looking to manage user authentication and access control for web applications. Understanding how JWTs are signed and shared is essential for any web developer looking to build secure applications. In this guide, we'll take a comprehensive look at JWTs, why they're useful and how they work. We'll also explore how to sign and share JWTs, using an RSA private/public key pair as an example.
You can read more about JWT here.
Why are JWTs useful?
JWTs offer several advantages over traditional session-based authentication. They are particularly useful for managing user identity and access control. Here are some specific reasons why JWTs are useful:
Stateless: Because JWTs are stateless, the server doesn't need to maintain the user's session. This enables greater scalability and performance in a distributed system. Also makes them particularly useful in microservices architectures, where multiple services may need to verify the identity of a user without relying on a centralized authentication service.
Security: JWTs are designed to be tamper-proof, meaning that they ensure the integrity of the data. This makes JWTs an effective tool for protecting sensitive information such as user identities and authorization data. Additionally, encrypting JWTs using a secret key further enhances their security by making it impossible for anyone to read the token's contents without the correct decryption key.
Flexibility: Users can use JWTs for various purposes, including authentication, authorization, and transmission of user information. Different types of applications, such as single-page applications, mobile apps, and APIs, can use them.
Interoperability: Different programming languages, platforms, and libraries widely support JWTs. This allows greater interoperability and integration between different parts of a web application.
JWT Structure
The basic structure of a JWT consists of three parts separated by dots: a header, a payload, and a signature. The header describes the fields like type of token, the algorithm used to sign it etc. The payload holds the actual data being transmitted, such as user ID or other user-specific information. The sender and receiver create the signature using a secret key, and use it to verify that the token has not been tampered with.
I will be utilizing jwt.io, which is the most commonly used online tool to define a JWT. First, on jwt.io, we select the RSA256 algorithm from the dropdown list. After selection, the tool offers a set of predefined JWT claims that can be modified as per the specific requirements of the application or use case.
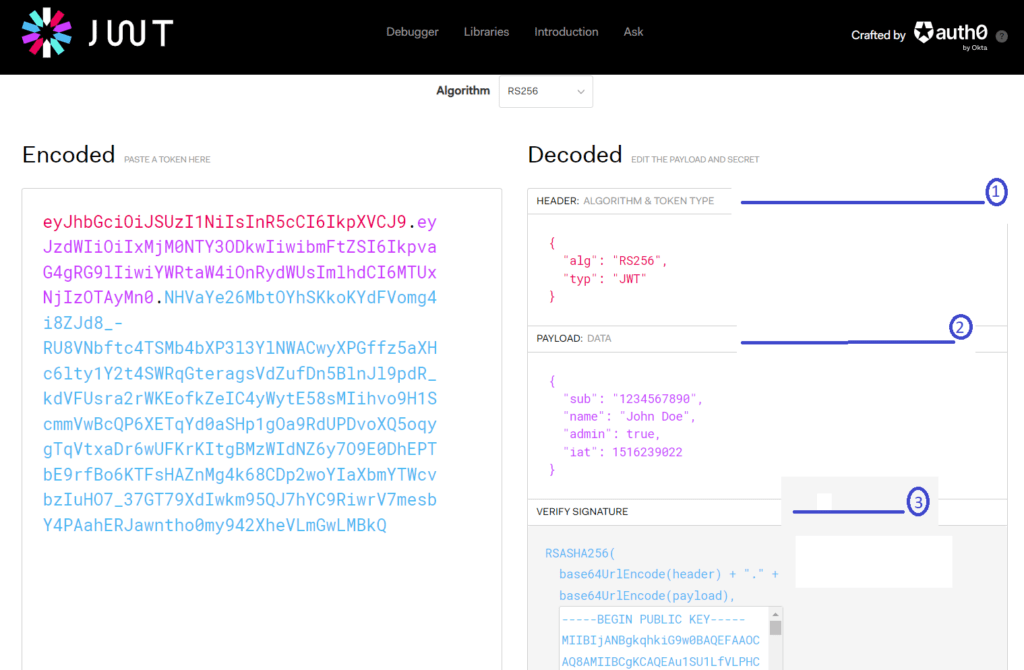
On the left side we see base64 encoded JWT, whereas on the right side we see a decoded version. In the previous section we discussed JWT has three sections, header, payload and signature. Let’s look each of them one by one,
Header
The header section contains two key-value pairs:
"alg": "RS256" - defines the algorithm used for signing the JWT.
"typ": "JWT" - specifies the type of token, In this case, it is a JWT token.
Payload
The payload contains the claims of JWT, which are key-value pairs that represent information-to-exchange about a user or an entity. The claims fall into three categories: registered, public, and private claims. You can read details about different types of claims in RFC-7519.
In above image, the payload contains four key-value pairs:
"sub": "1234567890" - represents the subject of the JWT, which in this case is a unique identifier for the user. The value "1234567890" represents the user's ID.
"name": "John Doe" - This is a custom claim that represents the user's name.
"admin": true - This is another custom claim that indicates whether the user is an admin or not.
"iat": 1516239022 - This is a standard claim that represents the "issued at" timestamp of the JWT, indicating when the token was issued.
Note: we can add, modify or delete any of the fields in header and payload, following the guideline defined in RFC-7519. This makes JWT a flexible way for sharing the information.
Signature
The final component of a JWT is the signature, which is generated by signing the header and payload sections of the token using a secret or private key. For RSA256, the issuer's private key is used to generate the signature. The jwt.io tool provides a drop-down list of algorithms, including RSA256, and allows users to generate and fill both private and public keys in the Signature section.
However, it is not recommended to use the pre-populated private key in your application since it is well-known and therefore not secure. Instead, it is advisable to generate a new private key that is unique and known only to you.
In the next section, "Generating Private/Public keys," I will provide a detailed explanation of how to generate private/public keys and use them to sign a JWT. By following these steps, you will be able to create secure JWTs for use in your applications.
Generating Private/Public keys
Clients can ensure secure communication with servers by employing cryptographic algorithms like RSA to create a private and public key pair. The client should keep the private key confidential and exclusively use it to encrypt messages that the server can decrypt with the corresponding public key. Conversely, the client shares the public key with the server, which uses it to decrypt messages encrypted with the client's private key. This process guarantees that only the intended recipient can read messages, while only the server can decipher messages sent by the client.
To create the necessary private and public keys, we will use the command-line tool openssl genpkey, which is part of the OpenSSL toolkit. The OpenSSL library is widely used in software applications to implement cryptography. In the next section, we will guide you on how to create private and public keys using openssl genpkey.
Private key
openssl genpkey -algorithm RSA -out my_private_key.pem -pkeyopt rsa_keygen_bits:4096
The options used in this command are as follows:
-algorithm RSA: specifies that the RSA algorithm should be used to generate the key pair.
-out my_private_key.pem: specifies the name of the output file that will contain the private key.
-pkeyopt rsa_keygen_bits:4096: specifies that the key size should be 4096 bits. This is a large key size that provides a high level of security.
When this command is executed, it will generate a private key file called my_private-key.pem in the current directory.
Public Key
Now we will convert a private key file (generated in previous step) to a public key file by following command,
openssl rsa -pubout -in my_private_key.pem -out my_public_key.pem
The options used in this command are as follows:
-pubout: specifies that the output should be a public key file.
-in my_private_key.pem: specifies the name of the input file that contains the private key.
-out my_public_key.pem: specifies the name of the output file that will contain the public key.
When executing this command, it reads the private key from the input file (my_private_key.pem), extracts the public key from the private key, and writes the public key to the output file (my_public_key.pem). The server can then use the resulting public key file, which can be used to encrypt messages that are intended for the client and shared.
Sign and Share JWT
Once we create the private and public keys, we can use them to sign and verify the JWT. We must replace the pre-populated public and private keys with our own to verify the signature. Using a tool such as jwt.io, we can ensure that the JWT's signature is authentic and has not been tampered with.

With the private/public key pair-generated and signed JWT, we can now use it for user authentication and authorization in our application. The client can securely transmit the JWT, and the server can decode and verify it to ensure that the user is authorized to access the requested resources.
To gain access to a protected resource within an application, the user must present a valid JWT to the server. The Bearer schema is typically used to send the JWT within the Authorization header of the HTTP request.
Authorization: Bearer <token>
How server process JWT
When a server receives a JWT in the Authorization header of an HTTP request, it reads the token and verifies its signature using the public key shared by the client. If the signature is valid, the server can trust that the JWT has not been tampered with and that it was indeed issued by the expected party. The server then proceeds to decrypt the JWT using the public key to retrieve the payload, which contains the requested claims from the user.
Once the payload has been decrypted, the server can read and process the claims within the JWT to authenticate and authorize the user. It also checks if the user has the necessary permissions to access the requested resource, and if the JWT has expired or has been revoked.
The server can serve the requested resource if the JWT claims are valid and the user is authorized. Otherwise it rejects the JWT and denies access to the resource. The server either grants or denies access based on the JWT's validity and user authorization status.
Conclusion
JSON Web Tokens (JWTs) are a popular way to securely transmit information between parties. Users can use JWTs for authentication, authorization, and transmitting user information. JWTs have a specific structure consisting of a header, payload, and signature. Defining JWT claims can be done using online tools like jwt.io, which can help customize the token to meet specific requirements.
The process of signing and sharing JWTs involves generating a private and public key pair using a tool like OpenSSL. The private key is used to sign the JWT, while the public key is used to verify the signature. Clients can include the JWT in the Authorization header of HTTP requests using the Bearer schema. Upon receiving the JWT, servers can read and process the claims within the JWT to authenticate and authorize the user.
We hope this article has provided you with a comprehensive understanding of JWTs and their use cases. To stay updated on the latest technologies and trends, be sure to check out more articles on our website. Thank you for reading!