This blog will walk you through the steps to create and launch an AWS EC2 instance using a free tier account. It will cover the entire process from signing up for a free tier account to creating and launching an instance, installing web server on startup and connecting to it using SSH, management console and web browser.
Introduction
Amazon Elastic Compute Cloud (EC2) is a popular cloud computing service offered by Amazon Web Services (AWS). EC2 provides scalable computing capacity in the cloud, allowing businesses to quickly spin up virtual servers, also known as instances, to run their applications and workloads. With EC2, businesses can select from a wide range of instance types, with different operating system, each with varying levels of CPU, memory, storage, and networking capacity, to meet their specific needs. EC2 also offers flexible pricing options, including on-demand, reserved, and spot instances, to help businesses optimize their costs.
You can launch EC2 instances in a matter of minutes and scale them up or down as per your needs. You only pay for what you use, which makes EC2 a cost-effective solution for running applications and services in the cloud. Good thing about using EC2, for new learners, is that they can create instances using a free tier account. This means that they can try out EC2 for free and explore its features without paying a penny.
Setting up AWS Free Tier Account
Before we dive into creating an EC2 instance using a free tier account, it's important to have an AWS account. If you don't have an account already, I highly recommend checking out my previous blog post on how to create a free tier AWS account. This post covers everything you need to create an account step-by-step, including creating IAM users, and enabling MFA. Once you have an AWS account set up, you can follow the steps in this post to create an EC2 instance.
Here are the steps to create an EC2 instance eligible in free tier account:
Note: I will create a heading for the steps which require more explaination.
- Sign in to the AWS Management Console using your AWS account credentials.
- Search EC2 in the search bar and navigate to the EC2 dashboard.

3. Click the "Launch Instance" button.
4. Add any required tags to your instance for organization and tracking purposes, let’s call it “my-first-instance”.
Amazon Machine Image (AMI)
Choose an Amazon Machine Image (AMI) for your instance. You can select from a variety of pre-configured images that include different operating systems and software configurations. Following is a list of common Amazon Machine Images (AMI) that are available under free tier account:
- Amazon Linux
- Ubuntu
- Microsoft Windows
- RedHat Linux
- SUSE Linux
In this example I select "Amazon Linux" AMI, which is a default selection.
Instance type
Choose an instance type that is eligible for the free tier account, you can identify them by the "Free tier eligible" label on the instance type selection page. In this example I select the default option which is t2.micro, which has one CPU and 1GiB memory size.
Key Pair (login)
While creating an EC2 instance, you have the option to use a key pair for secure login to your instance. A key pair consists of a private and a public key. These keys are used to access the EC2 instance using SSH and make it much more secure. Using a key pair also ensures that your connection to instance is encrypted, preventing unauthorized access and data theft.
Click on "Create new key pair", a new pop up window will appear, input as shown in this figure,
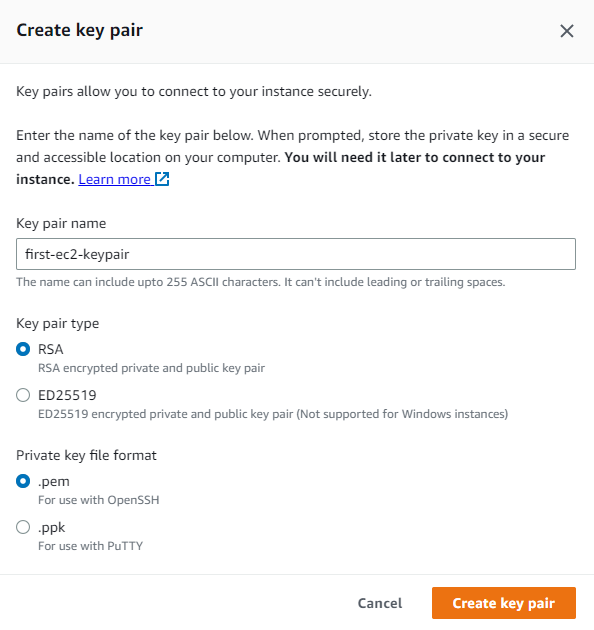
This will trigger downloading your key - save and protect it.
Network Settings
Select the default network settings in this example.
Security Group
Configure your security group to control inbound and outbound traffic to your instance. We must only allow the necessary ports to minimize the security risks. When setting up a security group, there are several factors to consider, some of them are as:
Required ports: Determine which ports need to be open for your application to function correctly. For example, if you're running a web server, you may need to open port 80 for HTTP traffic and port 443 for HTTPS traffic. Make sure to only allow the necessary ports and protocols to minimize security risks.
IP addresses and ranges: Specify which IP addresses and ranges are allowed to access your instance. This ensures that only authorized users can connect to your instance, while others are blocked.
Ingress and egress rules: Ingress rules control traffic coming into your instance, while egress rules control traffic leaving your instance. We must only allow traffic that is necessary for our application to function.
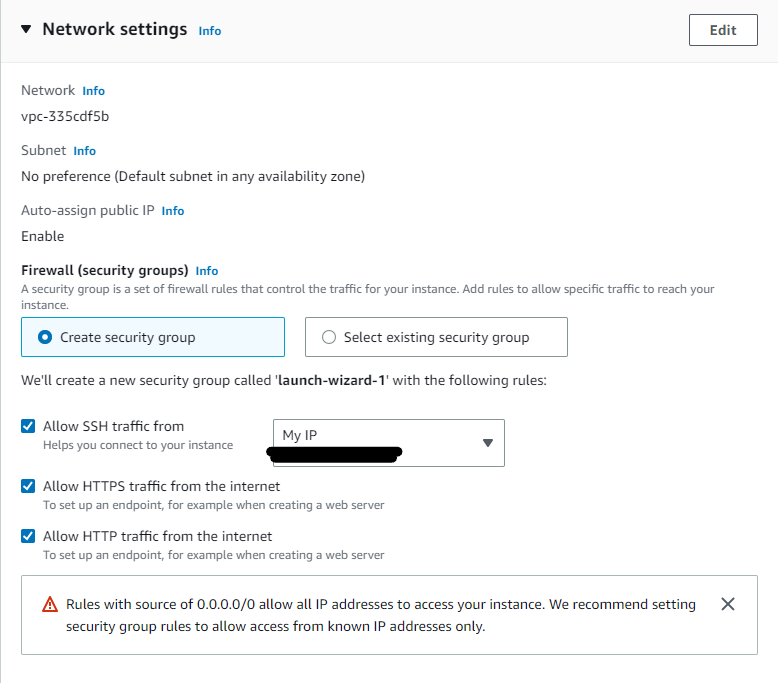
In this example, I create a simple Security group which allows,
- SSH access to EC2 instance from IP address of my local machine only. You can configure this according to your requirements. However, allowing the default IP 0.0.0.0/0 can be risky since it allows anyone on the internet to SSH to your instance.
- HTTPS traffic because we will install an Apache web server in this instance (step 11)
- HTTP traffic
Configure storage
We keep the default value of storage, in this case 1 x 8 GiB gp2 (general purpose SSD).
User data
User data is a feature in Amazon EC2 that allows you to pass scripts or commands to an EC2 instance when it launches. We often use this data to automate the initial configuration of an instance. It can be used for tasks such as installing software, setting up a web server, or performing other setup tasks.
When an EC2 instance launches, it retrieves the user data and executes it. This can be a powerful tool for automating the setup and configuration of instances, making it easier to deploy and manage large numbers of instances at once.
Find the User Data option under the "Advance details" section.
In this example, on system startup, I update all the installed packages to their latest version (yum update -y), and then install the Apache HTTP server (yum install -y httpd), also known as httpd, on the system.
systemctl start httpd command starts the httpd service, which allows the Apache HTTP server to begin serving web pages. systemctl enable httpd sets the httpd service to start automatically at boot time, ensuring that the Apache HTTP server is always running on the system.
#!/bin/bash
yum update -y
yum install -y httpd
systemctl start httpd
systemctl enable httpd
12. Review your instance configuration and launch it. AWS may take few seconds to couple of minutes to setup and run new EC2 instance. Once it is ready you will see the status "Running" in management console,

Connect to EC2 Instance
Finally, connect to your instance and start using it.
Connect EC2 instance using management console: You can connect to your instance using the AWS Management Console,
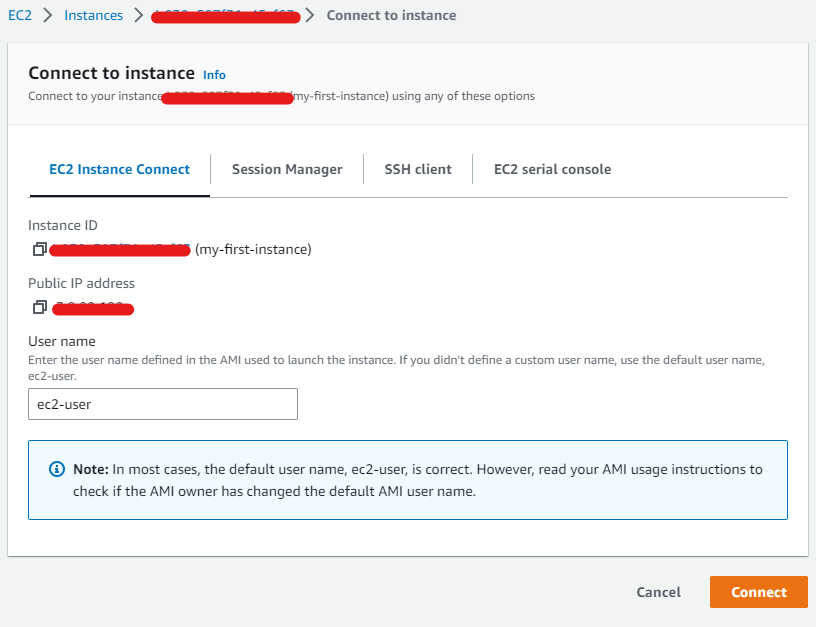
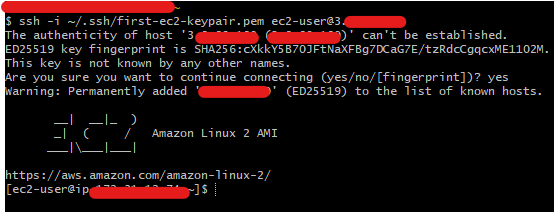
Connect EC2 instance using SSH: we can also connect to EC2 instance using SSH, for that we need instance default username ec2-user (or you can change it as well), public IP address assigned to the instance and private key, which we created in step 7 above,
$ ssh -i ~/.ssh/first-ec2-keypair.pem ec2-user@<public-ip-address>Note: While creating the security group in step 9, I allowed only my PC public IP address to make SSH connection to this EC2 instance.
Testing web server installed on EC2 instance
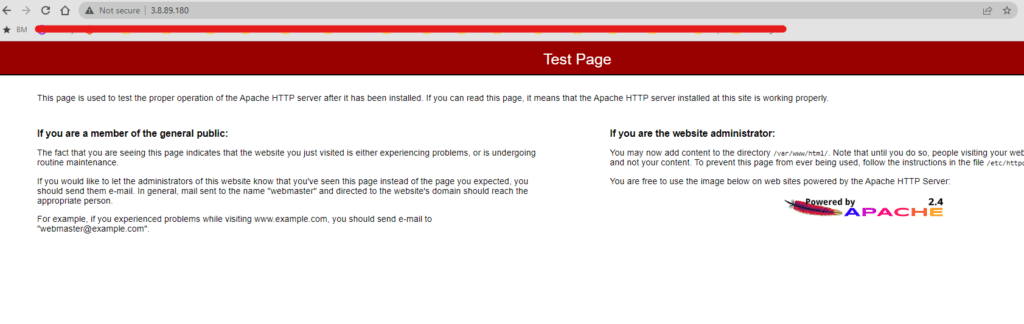
In step 11 we defined "User Data", and in that we instructed AWS to install Apache web server onto this EC2 instance on startup. Now as our instance is up and running, we can verify whether the apache web server is functional or not. Write the public IP address of instance on the browser, and we should see the webserver test page.
Remember: While defining Security group we did allow the HTTP traffic to access this EC2 instance.
Terminate EC2 instance
It is important to terminate EC2 instances after testing in a free tier account, which comes with a limited amount of resources, and running instances unnecessarily can quickly exhaust these resources and lead to additional charges.

After you terminate an instance, it remains visible in the console for a short while, and then the entry is automatically deleted. You cannot delete the terminated instance entry yourself[1].
Conclusion
Creating an EC2 instance using a free tier account is a simple process that can be completed in just a few steps. By following these steps, you can quickly set up an EC2 instance and begin using it for your cloud computing needs. Once your instance is launched, you can connect to it and start using it for your desired applications or services. Keep in mind that while the free tier offers limited resources and usage, it is a great way to get started with AWS and gain experience with cloud computing. As your needs grow, you can easily upgrade to paid instances with more resources and features.