
In this document I will explain how to set up the Spring Boot development environment in VS Code. You will find the instructions to install and configure,
- JDK 23
- Gradle 8.10.2
- Visual Studio Code (VS Code)
I will also create and run a basic spring boot application.
Introduction
Spring boot is an open source, production-ready java development framework suitable for stand-alone applications, which run on Java Virtual Machine (JVM). Spring boot is quite popular framework to develop the Restful microservices, Model-View-Controller (MVC) applications, etc.
Visual Studio Code is a free, lightweight Integrated Development Environment (IDE) by Microsoft. It is a great addition to Java code editing tools, and a good alternate to IntelliJ, eclipse etc.
Gradle is a build automation tool for multiple language development. It makes the development tasks much easier, such as compile, build, test, package, etc.
Let’s start setting up the environment..
Development Environment
Operating System
The instructions written in this document is valid for Windows 10 or above.
Java 23
We start with installing the latest available JDK 23. Go to JDK 19 download page, and download Windows x64 msi Installer and install.
Gradle
I will install the latest available Gradle version, i.e. 8.10.2. We will download the archive file from this link,
Select v8.10.2 and then Download: binary only. This will download the Gradle-8.10.2-bin.zip file.
Create a new directory C:\Gradle (or any preferred location). Uncompress the Gradle-8.10.2-bin.zip file in C:\Gradle.
Environment Variables
You can use any command line tool to set environment variables. Here, we'll use Windows PowerShell. First, let's check the existing value of JAVA_HOME to see if it is already set. Open Windows PowerShell and type:
$Env:JAVA_HOMENote: $ is the part of the command.
If it returns an empty string, it infers JAVA_HOME is not set. Let’s set it now,
$Env:JAVA_HOME = "C:\Program Files\Java\jdk-23"Now set GRADLE_HOME value,
$Env:GRADLE_HOME = "C:\Gradle\gradle-8.10.2"Add JAVA_HOME and GRADLE_HOME to PATH variable, so that the shell recognise java and gradle commands,
$Env:PATH += $Env:JAVA_HOME + ";\bin"
$Env:PATH += $Env:GRADLE_HOME + ";\bin"
Verify environment variable values,
echo $Env:JAVA_HOME
echo $Env:GRADLE_HOME
echo $Env:PATH
Set environment variable using windows system properties,
We can also set the envirnment variable in Windows System Properties. For that, in Windows Start menu search for “Edit the system environment variable”,

Add JAVA_HOME and Gradle_Home system environment variables,
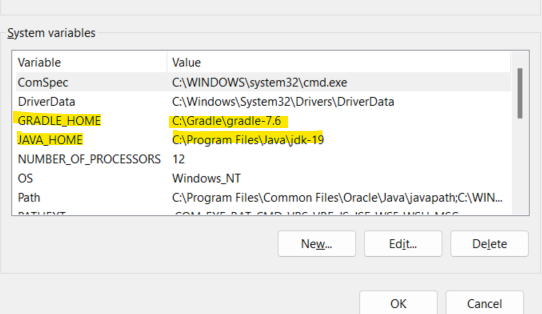
Add JAVA_HOME\bin and GRADLE_HOME\bin to the system PATH variable.
Spring Boot environment
Install VS Code
Install Visual studio Code (VS Code) from following link,
https://code.visualstudio.com/download
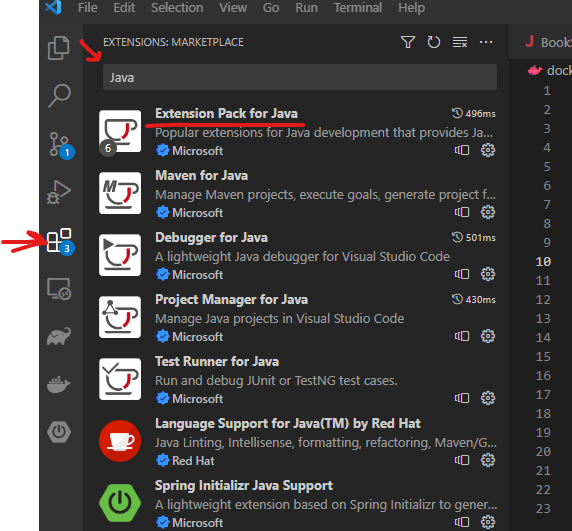
VS Code Extensions
Boost your productivity with these recommended VS Code extensions:
- Extension Pack for Java
- Spring Boot Extension Pack
- Gradle for Java
To install, click on the "Extensions" icon in the left menu and search for the desired extensions.,
Configure JDK 23 in VS Code
In order to create spring boot application, we need to configure JDK in VS Code.
In VS Code go to File/Preferences/Settings, and then select Extensions from the left menu. Expand the Extension to find a menu for Java. Scroll down to click on Edit in Settings.json.
OR
You can use command Pallet, Shift + Ctrl + P
or just press F1
Search for “Preferences: Open User Settings (JSON)” and add JDK and gradle home path and spring initializr service URL in json body,
"Java.jdt.ls.java.home": "C:\\Program Files\\Java\\jdk-23"
"java.import.gradle.home": "C:\\Gradle\\gradle-8.10.2"
"spring.initializr.serviceUrl": "https://start.spring.io/"Note: On Windows backslashes must be escaped, so C:\ must be written as C:\\
Spring initializr service URL is required to launch spring boot initializr. If we do not set it, and create a spring boot project using spring initializer we will get,
“Failed to create a project. Failed to fetch metadata.”
Create Spring Boot Application
Now we all set to launch spring initializer to create a new spring boot application,
Press Shift + Ctrl + P or F1 to open the command palette

Following are my project settings for this example,
Specify Spring version: 3.3.4
Specify project language: Java
Input Group Id for your project: com.example.mygroup
Input artifact Id: myfirstspringbootapp
Specify packaging type: Jar
Specify Java version: 23
Search for dependencies: let’s select Lombok, Spring Web (for web, Restful application using MVC). you can select other dependencies as well.
Press Enter
Select the destination directory to save the project. Spring Initializr will generate a templated project for spring boot application. This is how it looks after we finalize initialization.
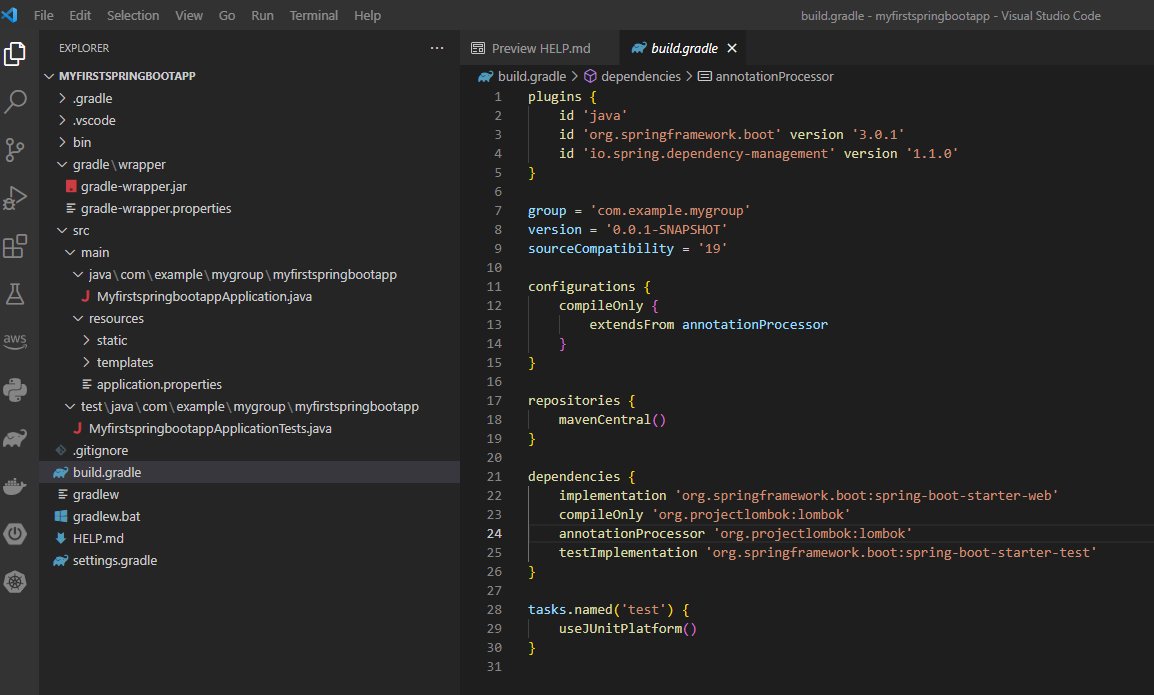
We can see src and test directories with their respective java classes. We also see the build.gradle file which consists of all the dependencies, plugins, and different tasks.
You can run this app now. Open the src.java.com.example.mygroup.myfirstspringbootapp/MyfirstspringbootappApplication.java file and run,

We will see Spring boot application started.

This is just a start to something great you can achieve with spring boot, Java and Gradle. Hope this will help you to take the first step toward that direction.
To deepen your understanding of Spring Boot Microservices and Docker containers, I highly recommend reading this article: Quick Start to Spring Boot Microservices and Docker. By following that blog, you will be creating a spring boot application, and add a controller to process HTTEP GET requests. You will also learn about how to package your spring boot application using docker container.